Explore Free & Reliable Streaming Options: Ditch Steam Link & Discover Open Source Solutions

Explore Free & Reliable Streaming Options: Ditch Steam Link & Discover Open Source Solutions
Key Takeaways
- Moonlight and Sunshine are open-source game streaming alternatives to Steam Link, offering better performance and customization.
- Both apps work on the same platforms as Steam Remote Play, with Sunshine supporting all major GPU vendors.
- Setup is straightforward, but using an Ethernet connection and HEVC/AV1 codecs can improve streaming quality.
Do you find that Steam Remote Play and Steam Link isn’t up to your standards? There’s an alternative you can try in the form of Moonlight and Sunshine. This open-source streaming combo works great, is easy to set up, and is available on the same platforms as Steam Remote Play.
What Are Sunshine and Moonlight?
The Moonlight and Sunshine open-source game streaming combo consists of two apps. The first one is Sunshine , an open-source, self-hosted game streaming host that works in combination with Moonlight , an open-source game streaming client. Together, the two present the best open-source alternative to Steam Link .
The two originally offered an open-source alternative to NVIDIA’s GameStream streaming protocol. But since NVIDIA abandoned GameStream some time ago, the combo is now the best alternative to Steam Remote Play .
How Moonlight and Sunshine Are Better Than Steam Link
Together, Moonlight and Sunshine excel at overall performance and customization. Not only is the open-source combo more stable than Steam Link and Steam Remote Play, but it also allows gamers to freely adjust streaming options such as resolution, frame rate, video quality, and more.
When I first tried Steam Remote Play on my Steam Deck, the image quality was decent, but the constant stuttering made me quickly give up on using it. Then I tried Moonlight in combination with NVIDIA Gamestream , and the resulting experience was head and shoulders above Steam Remote Play.
Once I switched to the NVIDIA app , I had to start using Sunshine because NVIDIA removed GameStream support from its new app. While I thought about returning to GeForce Experience , which still supports NVIDIA GameStream, I was blown away by Sunshine’s excellent lag-free performance and low-latency local streaming experience.
While NVIDIA GameStream, naturally, only supports NVIDIA GPUs, Sunshine works with GPUs from all three major vendors: NVIDIA, Intel, and AMD. You can still use NVIDIA GameStream if you’ve got an NVIDIA GPU and GeForce Experience installed, but AMD and Intel GPU owners are limited to Sunshine.
Local streaming is the main way I play PC games on my ROG Ally these days, which means I’m using the Moonlight and Sunshine combo daily. I can report that this works perfectly, even on my older Wi-Fi 5 router. I can recommend Sunshine over NVIDIA GameStream to every NVIDIA GPU owner, with Sunshine’s only downside being a bit more complex setup procedure. If you own an AMD or Intel GPU, I can recommend Moonlight and Sunshine over the Steam Link and Steam Remote Play combination any day of the week.
How to Use Moonlight and Sunshine
Setting up these streaming tools is pretty straightforward. Let’s cover the Sunshine setup procedure first.
The initial step is visiting the Sunshine GitHub page and downloading the appropriate installation package. I chose the Windows installation file.
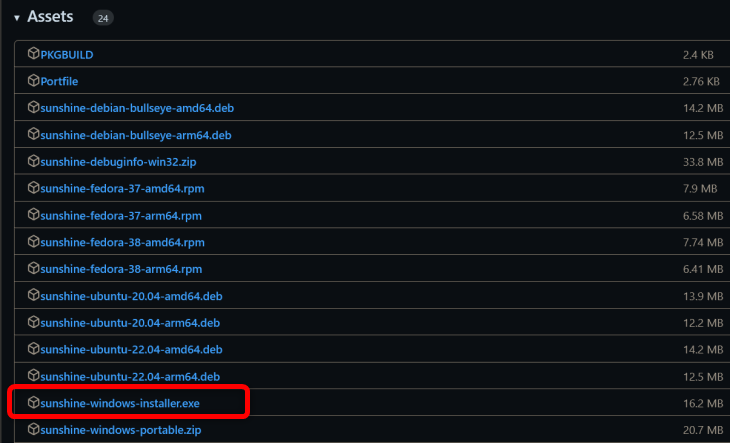
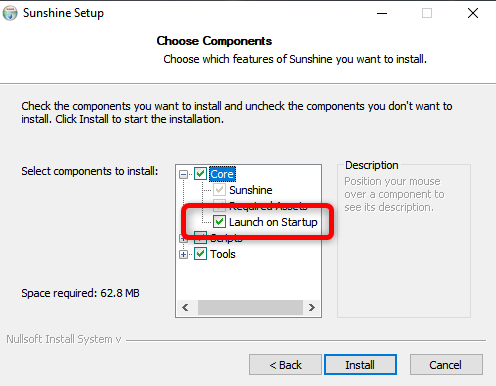
Once you download the Sunshine installation file, run it and enable the “Launch on Startup” option during the installation.
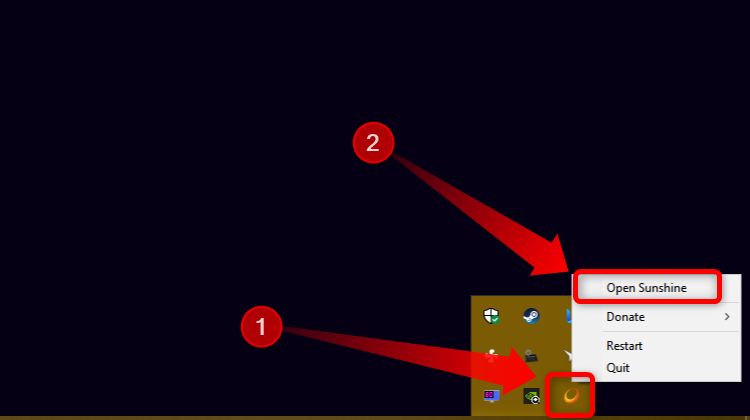
Once the installation finishes, Sunshine should automatically launch. You can find the app in the taskbar notification area. If it doesn’t start, find the app on your PC and launch it. You should now click the Sunshine icon and then click the “Open Sunshine” button.
This will open the Sunshine web UI. Now you have to create a username and password to access the web UI. Don’t forget to save the credentials; you’ll need them to use the Sunshine web UI later.
If your browser warns you about trying to access an insecure website, ignore the warning. These warnings usually have a button called “Advanced” that expands the warning and offers a new option you should click to take you to the website in question.
Once you access the web UI, go to the “Configuration” tab and set the hostname. This is your PC name, which is shown in the Moonlight client once you install it. Once you’ve named your PC, it’s time to install Moonlight.

Visit the Moonlight website , scroll down until you reach the download section, and download the appropriate version.
Next, install and launch Moonlight. You should be greeted by a locked PC icon bearing the name you’ve given to your PC in the Sunshine web UI. You will of course need to be on the same wireless network for this to work.
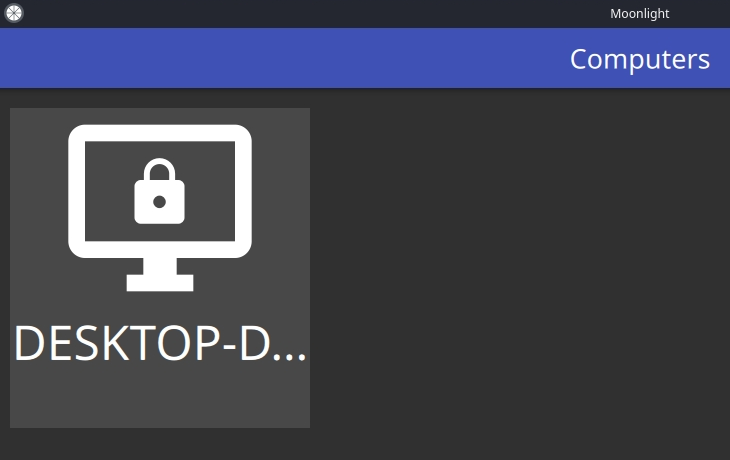
Click the locked PC icon, and Moonlight will provide you with the PIN you have to enter into the Sunshine web UI.

Open the Sunshine web UI, click the “PIN” tab, and enter the provided PIN. That’s it!

Now, you can add game and app shortcuts to Sunshine. The shortcuts you add will be shown in Moonlight once you click the PC icon.
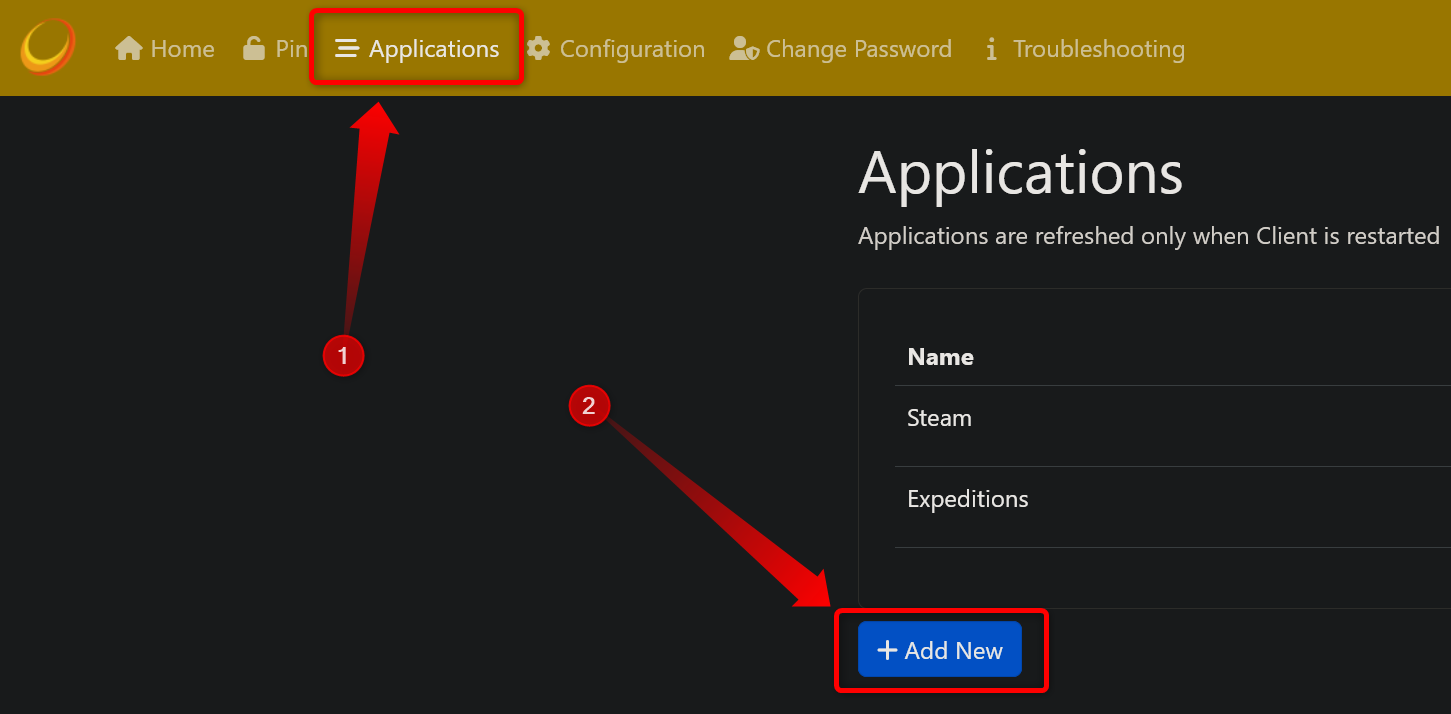
To add an app or game shortcut, visit the “Applications” tab in the Sunshine web UI and click the “Add New” button.
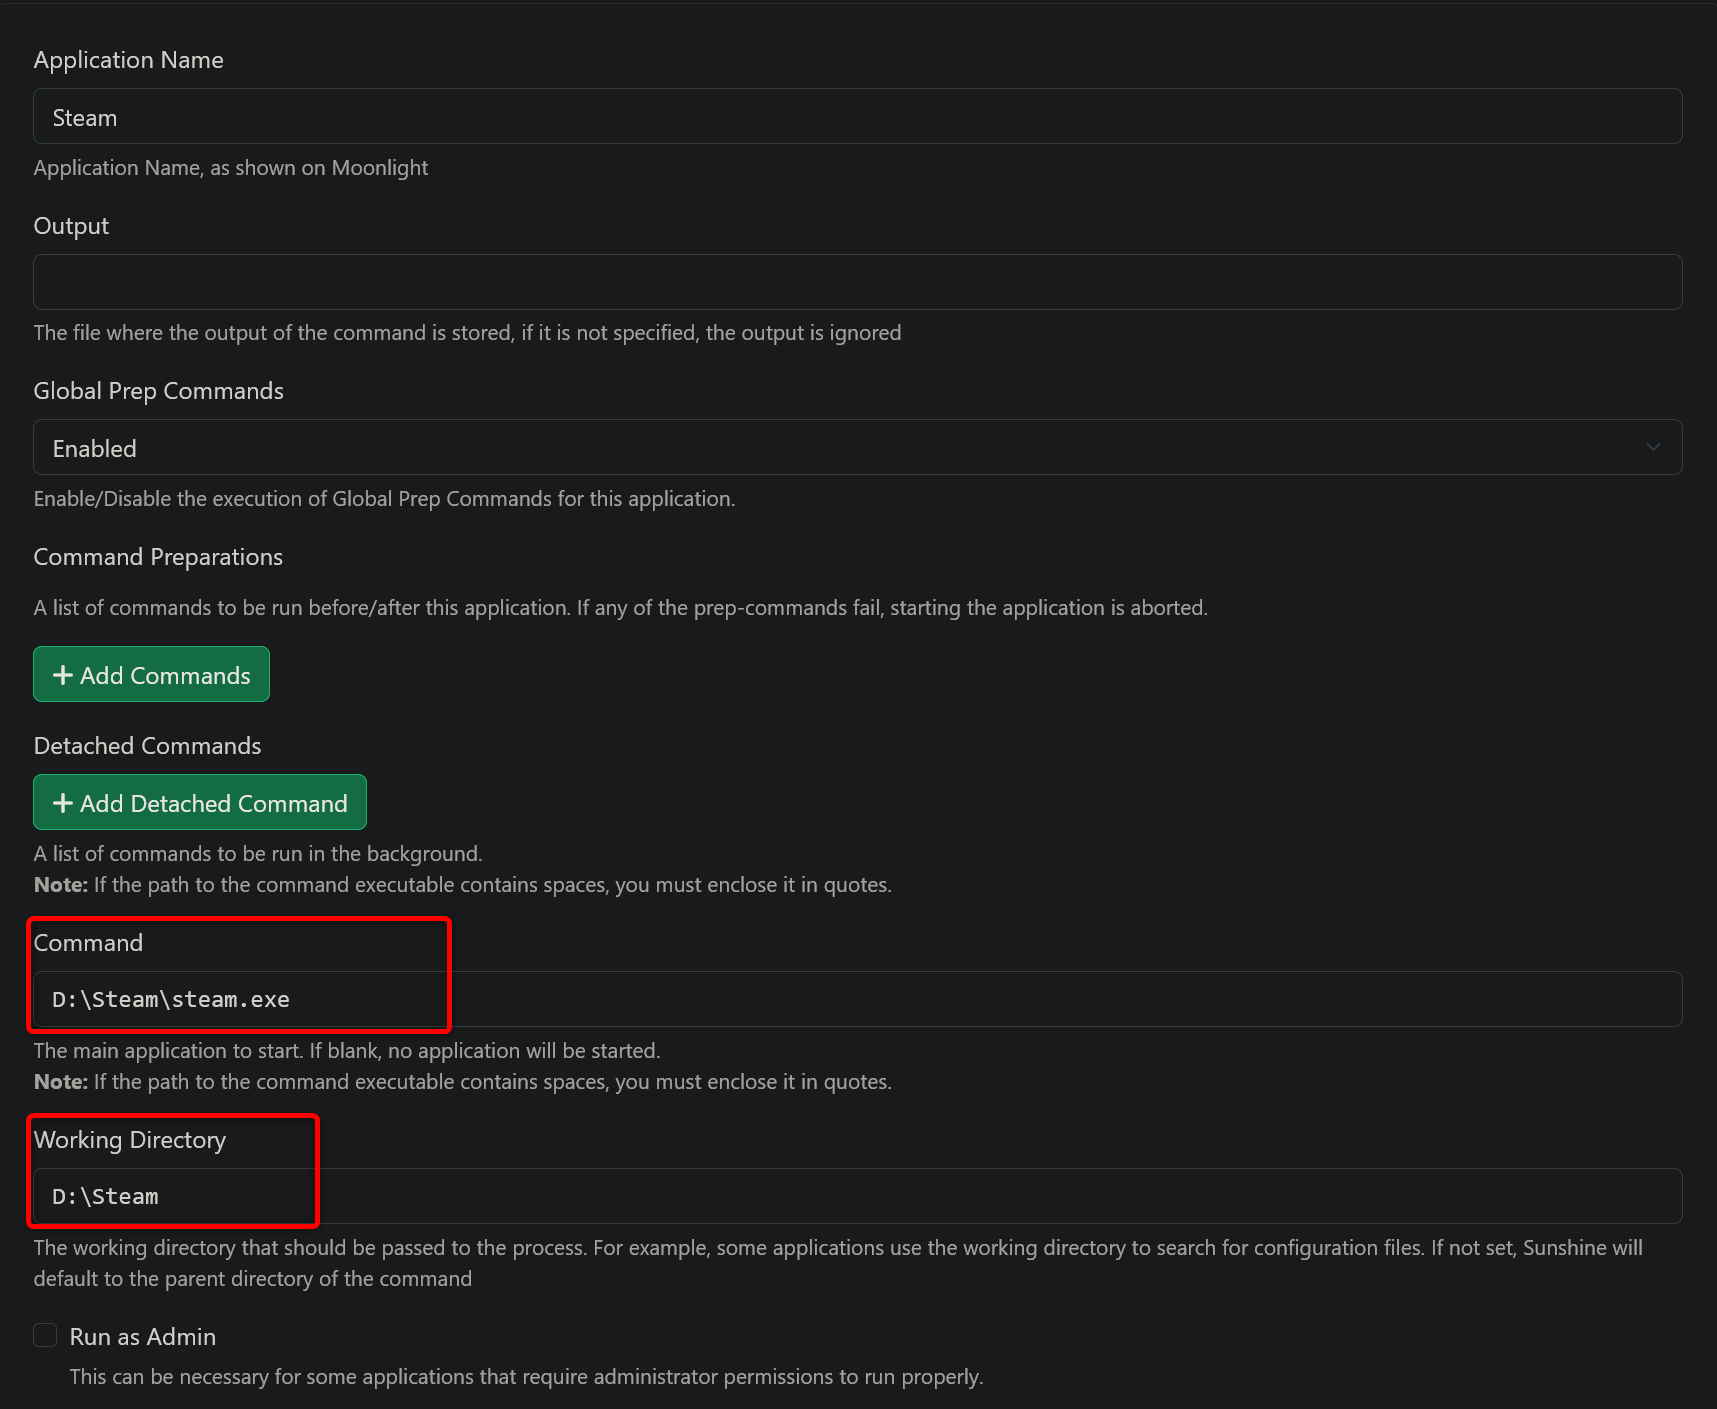
Make sure to name the app and enter the full path to the executable file of the app you want to add. Below is a screenshot showing the path to my Steam executable as an example.
Tips for Best Results
The next step I recommend is visiting the Sunshine Tutorials YouTube playlist. It has a ton of videos that explain how to tweak various settings and get the best possible streaming experience.
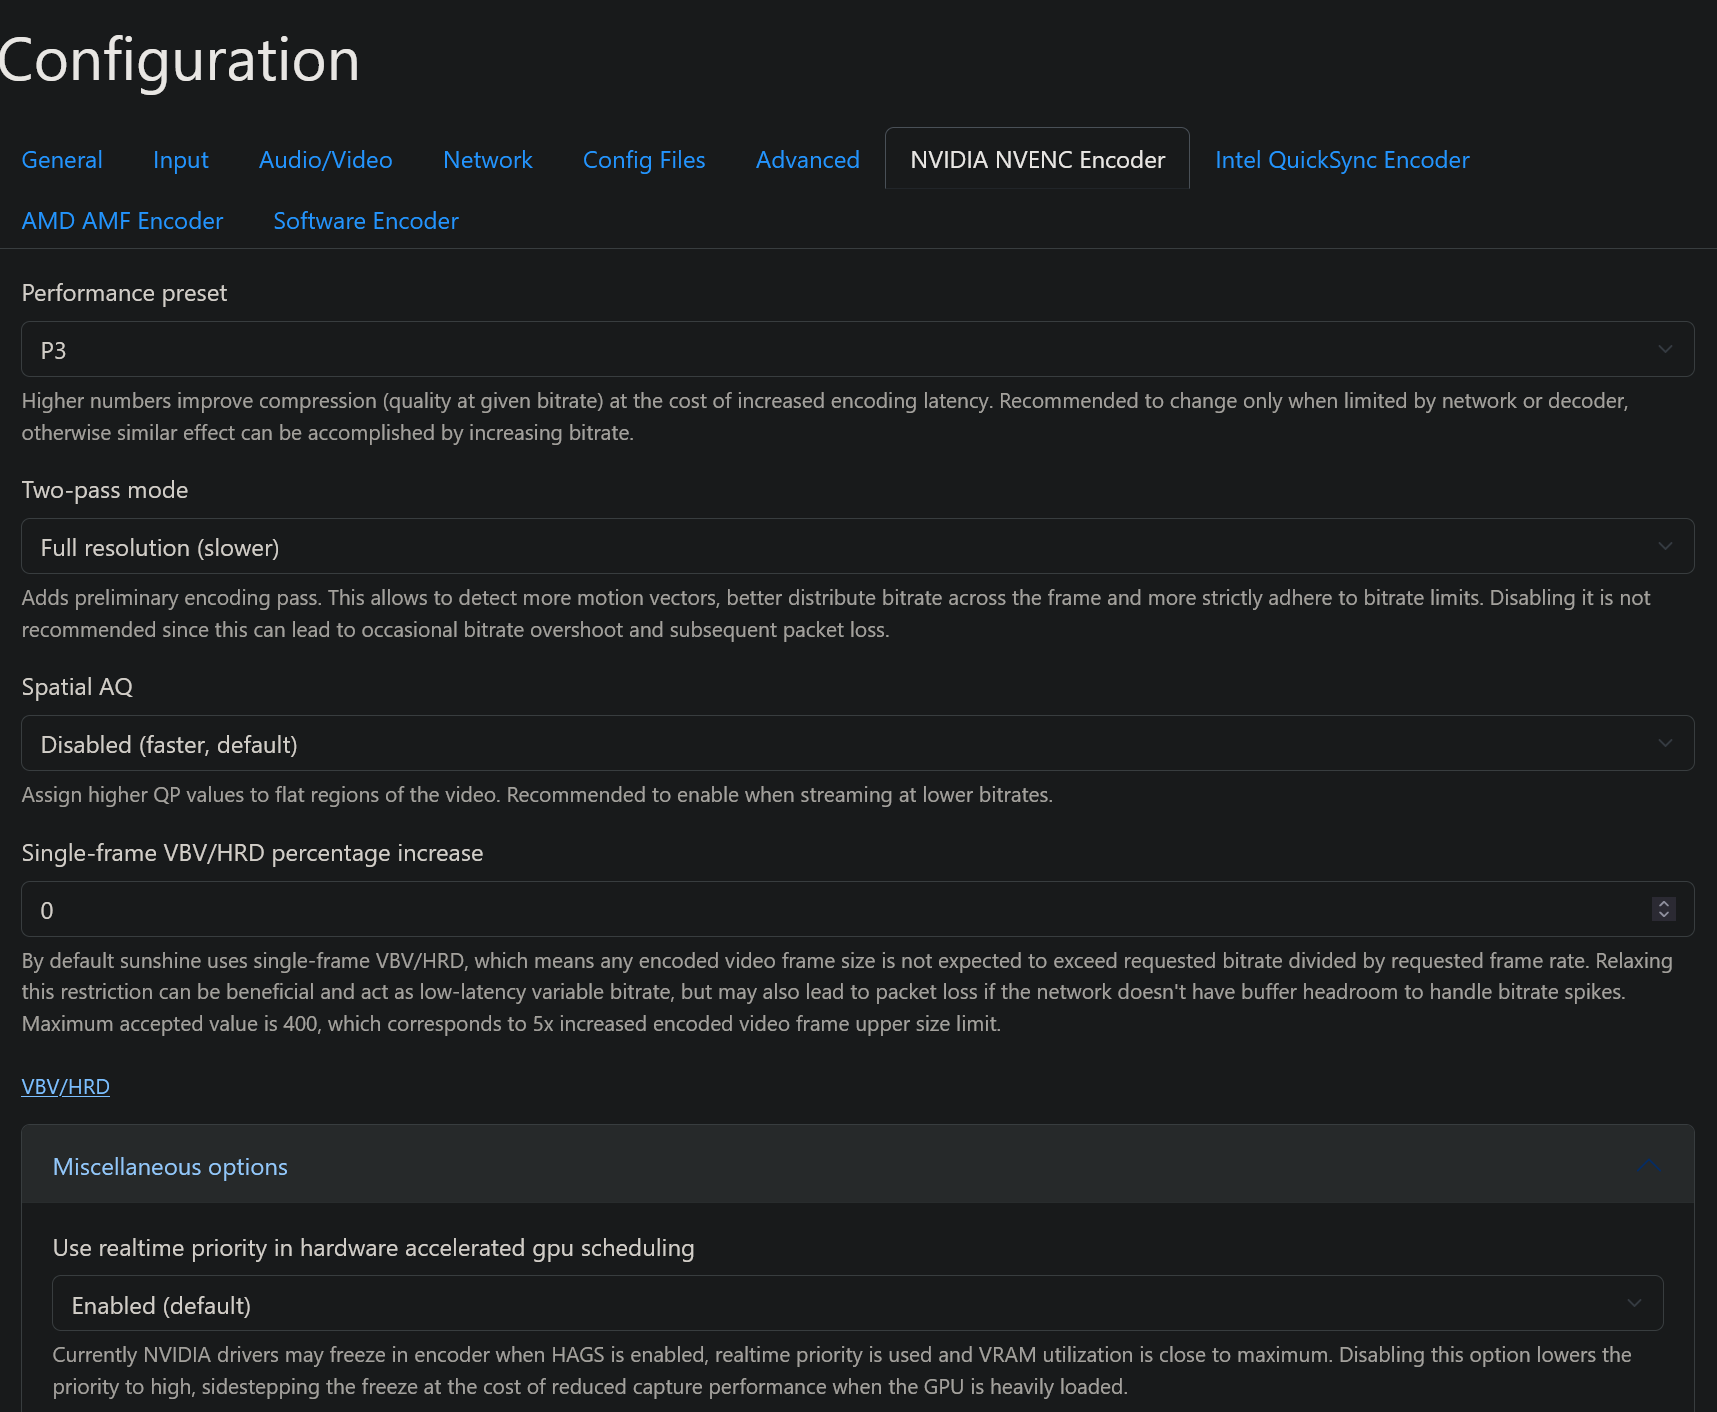
I’m also sharing the Sunshine and Moonlight settings I’m using for reference. Here are my Sunshine options:
And here are my Moonlight options:
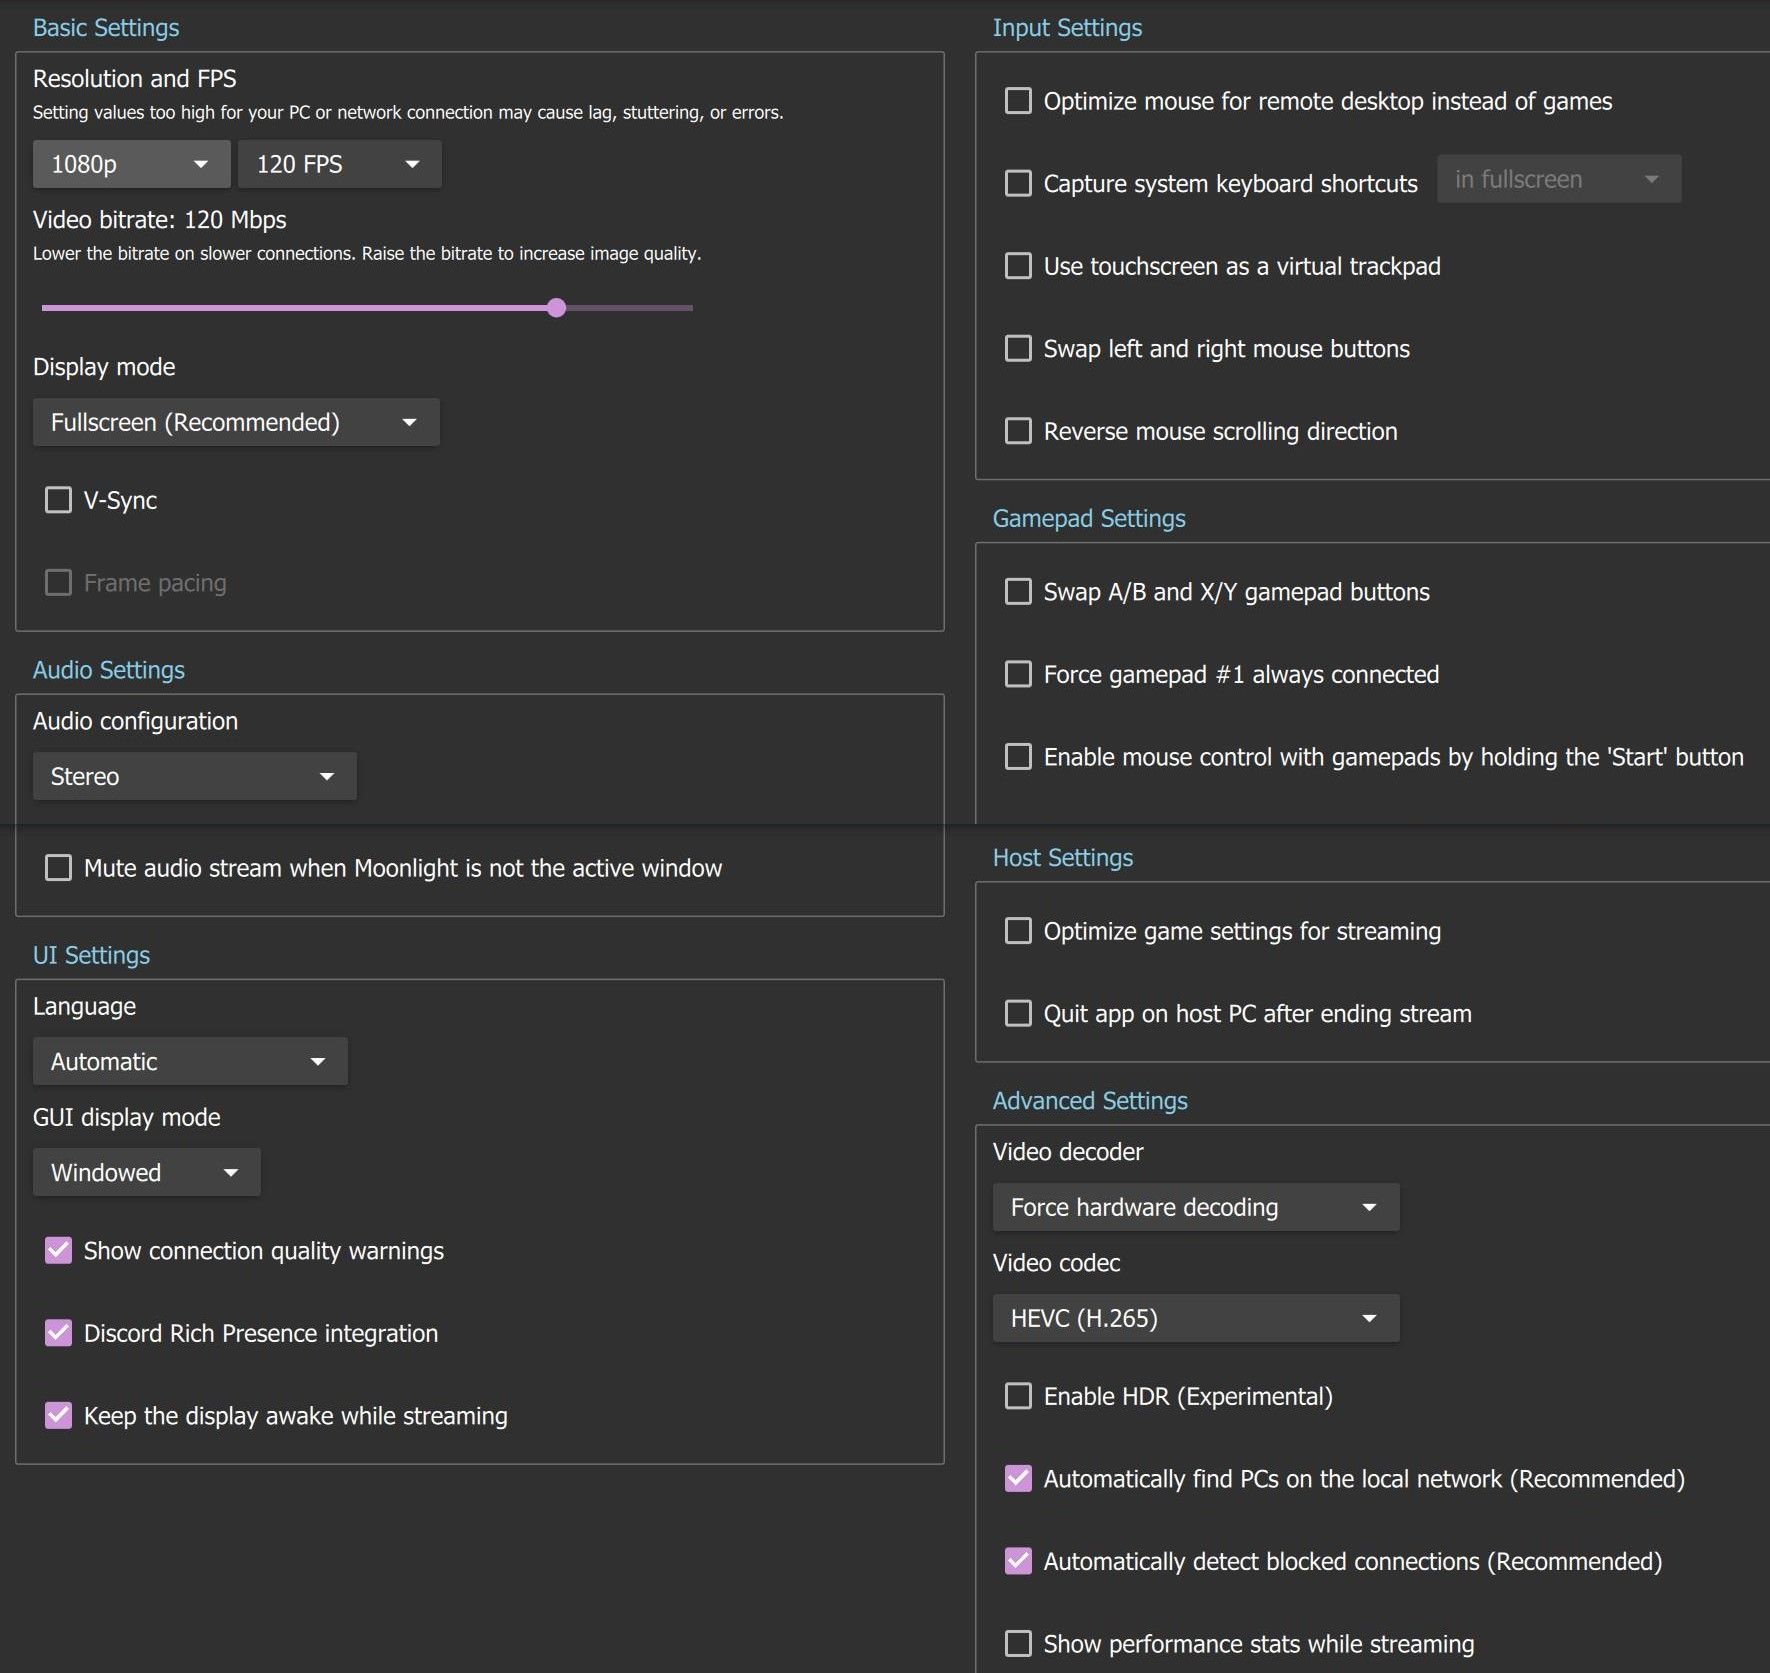
For the best possible experience, connect the PC you’re streaming games from to your router with an Ethernet cable. A quality Wi-Fi 5 or better router ought to be enough for a low-latency (below 10ms on average) experience. Also, I recommend selecting the HEVC or AV1 video codec , both of which work better than the default (H.264) codec and require less bandwidth to deliver the same image quality.
If possible, you should connect the client device you’re streaming games to with an Ethernet cable as well. The performance should be solid, even if you stream games wirelessly like I do with my ROG Ally (as long as the host device packs a decent Wi-Fi chip).
For example, the Wi-Fi 5 solution in my OG Steam Deck wasn’t good enough for a lag-free stream; upgrading to the ROG Ally and its Wi-Fi 6E card massively improved my local streaming experience.
Note that the more devices connected to the router and actively using the network, the higher the chance of encountering issues while streaming games. When my partner streams TV shows on her PC while scrolling social networks on her phone, I get occasional stutters when streaming games to my ROG Ally.
The same goes for streaming games via a Wi-Fi mesh network or a Wi-Fi extender device . For the best experience, you should connect directly to the router the host PC is connected to, or build a standalone wireless network running off a separate router you exclusively use for game streaming.
Sunshine and Moonlight are open-source, community-made game streaming solutions that are better than Valve’s built-in Steam streaming solutions. They remain my go-to choice for local game streaming. Give it a shot, you won’t be disappointed.
Also read:
- [New] 2024 Approved A Comprehensive List of 8 Authentic Propagation Tools
- [New] In 2024, Top 5 Techniques for Capturing Live Sound Over the Web
- [New] Step-by-Step Crafting Photos Into Engaging Videos in Pixiz
- [Updated] In 2024, Crafting Engaging Video Content for Live Streams
- [Updated] In 2024, Designers' Alley No-Cost, High-Impact Text PSDFree
- Expert Analysis: Why the New Amazon Fire HD 8 Is a Top Choice for Entry-Level Tablets
- Expert Picks for the Secureest Router Options for Kids' Internet Access, 202 Cuisine -4
- Experts' Take on the Jaco SmartPro: Ultimate Compact and Robust Tire Inflator Reviewed
- Explore the Six Premier Online Marketplaces for High-Quality Television Purchases
- Exploring Rayman Legends - A Comprehhemous Review of a Stunning 2D Gaming Journey
- Exploring the Features of Unihertz Atom XL - A Mini Device with Massive Capabilities
- Exploring the Ultimate List of Leading Handheld Gaming Systems
- Face-Off Review: How Does the Nintendo Switch Lite Stack Up Against the OLED Model?
- How to Reset a Itel A05s Phone that is Locked?
- In 2024, Stepwise Approach to Mastering Vimeo Recording
- Logitech G933 Sound Issues? Follow These Quick Fixes!
- The Ultimate Guide to PS5 Boot Options (6 Ways)
- Title: Explore Free & Reliable Streaming Options: Ditch Steam Link & Discover Open Source Solutions
- Author: Kenneth
- Created at : 2024-09-29 17:46:00
- Updated at : 2024-10-01 16:18:08
- Link: https://buynow-tips.techidaily.com/explore-free-and-reliable-streaming-options-ditch-steam-link-and-discover-open-source-solutions/
- License: This work is licensed under CC BY-NC-SA 4.0.