
Expert Guide to Optimize ASUS ROG ALY Laptop: Top 20 Tips for Longer Battery Duration and Superior Gaming Sessions
Expert Guide to Optimize ASUS ROG ALY Laptop: Top 20 Tips for Longer Battery Duration and Superior Gaming Sessions
Quick Links
- Optimize Windows for Your ASUS ROG Ally
- Tweak Buttons and Thumbsticks for a Better Gaming Experience
- Tips for Boosting ROG Ally Performance and Battery Life
- A Couple of Bonus Tips
- Check r/ROGAlly From Time to Time
I’ve been enjoying my ASUS ROG Ally since launch. In that time, I’ve amassed a truckload of tricks and tips that have made using the handheld more satisfying. If you’re a new ROG Ally owner, here are some of the things I wish I knew from the start.
Optimize Windows for Your ASUS ROG Ally
After you turn on your ASUS ROG Ally for the first time and go through the setup procedure, you should optimize Windows for use with your new handheld.
Update Windows, MyASUS App, and Armoury Crate
Windows will most likely start updating automatically during the setup process, as long as you’re connected to a wireless network. All you have to do is wait for the updates to install and for your handheld PC to restart, restart, and restart again.
Once you go through the initial Windows update process, it’s time to update the two ASUS apps: MyASUS and Armoury Crate. The first is responsible for BIOS and other critical system updates, whereas the second is an all-in-one control center and game launcher you’ll most likely use all the time. I recommend keeping your Ally hooked up to a charger during the update process.
To find MyASUS updates, open the app and click the “Check Update Items” button on the home screen.
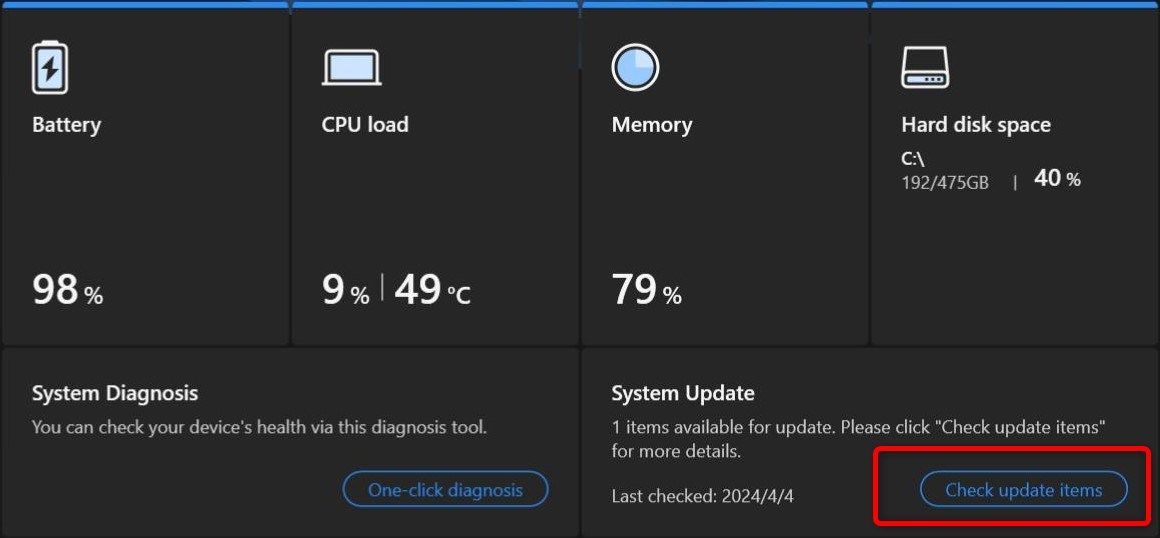

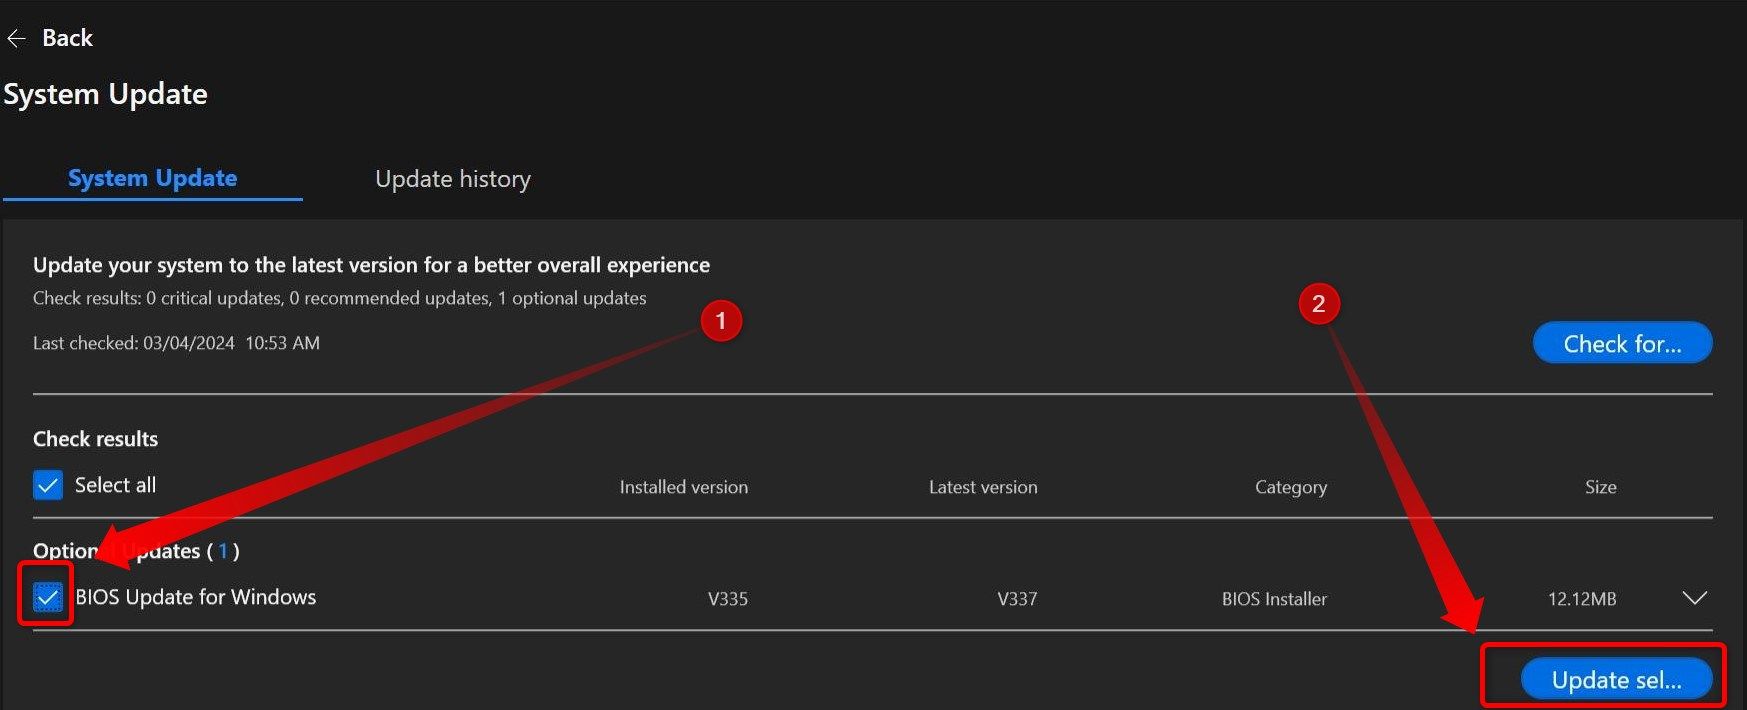
Once on the update screen, mark the updates you want to install, click the “Update Selected” button, and wait for the updates to install.
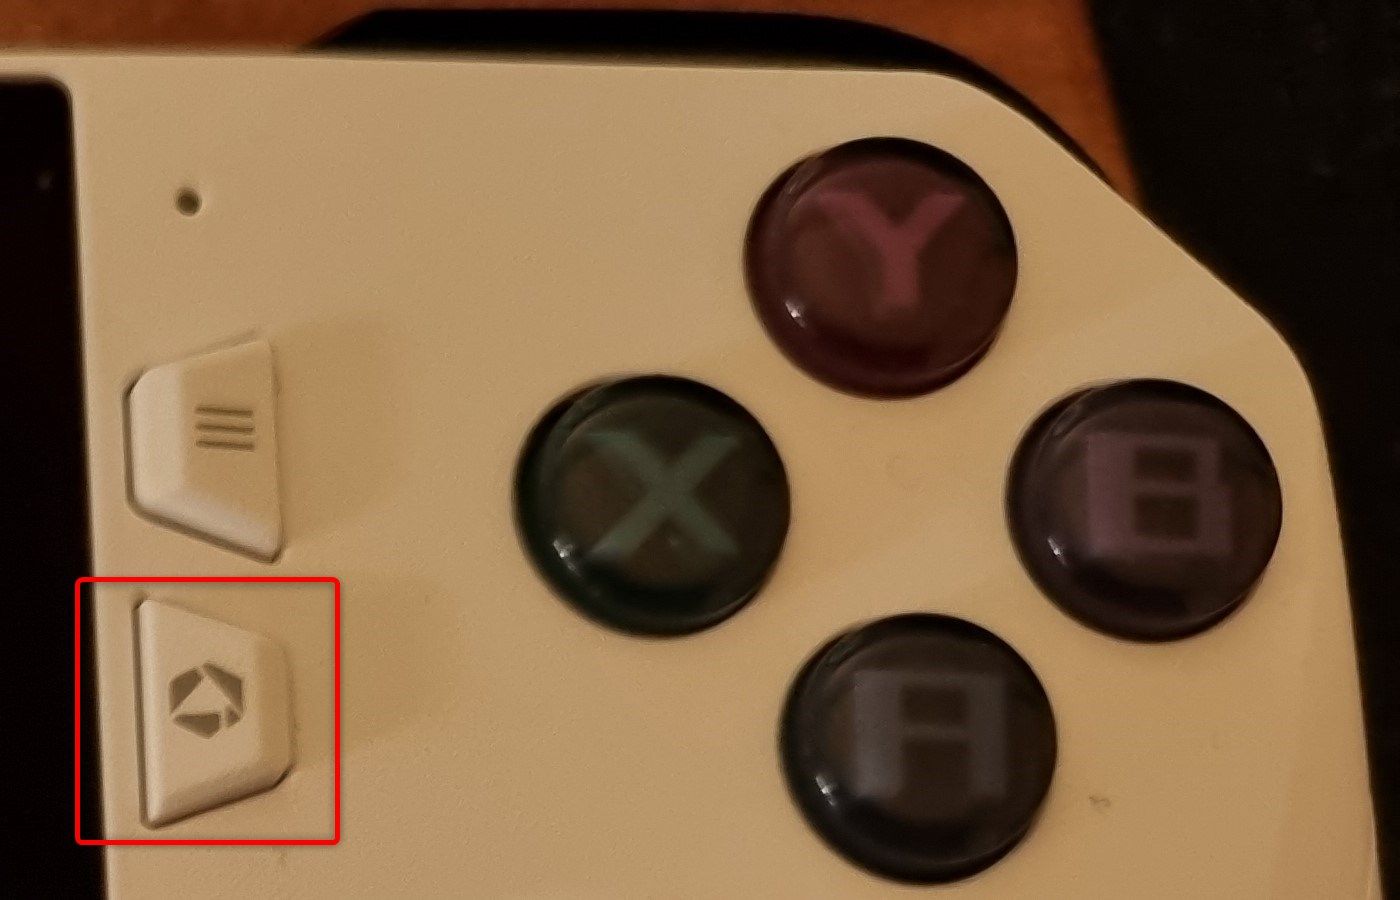
Next, open Armoury Crate. You can open the app with the physical Armoury Crate button located to the left of the “X” face button on your handheld.
Goran Damnjanovic / How-To Geek
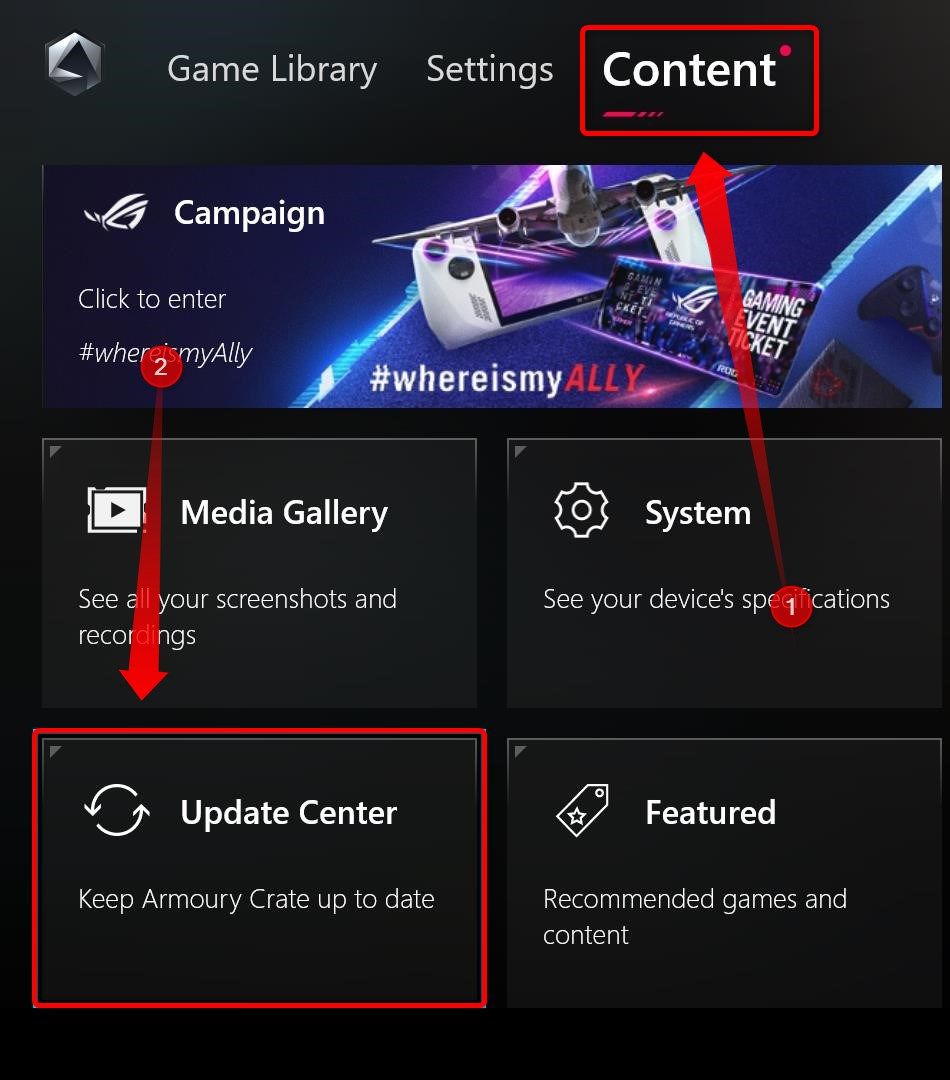
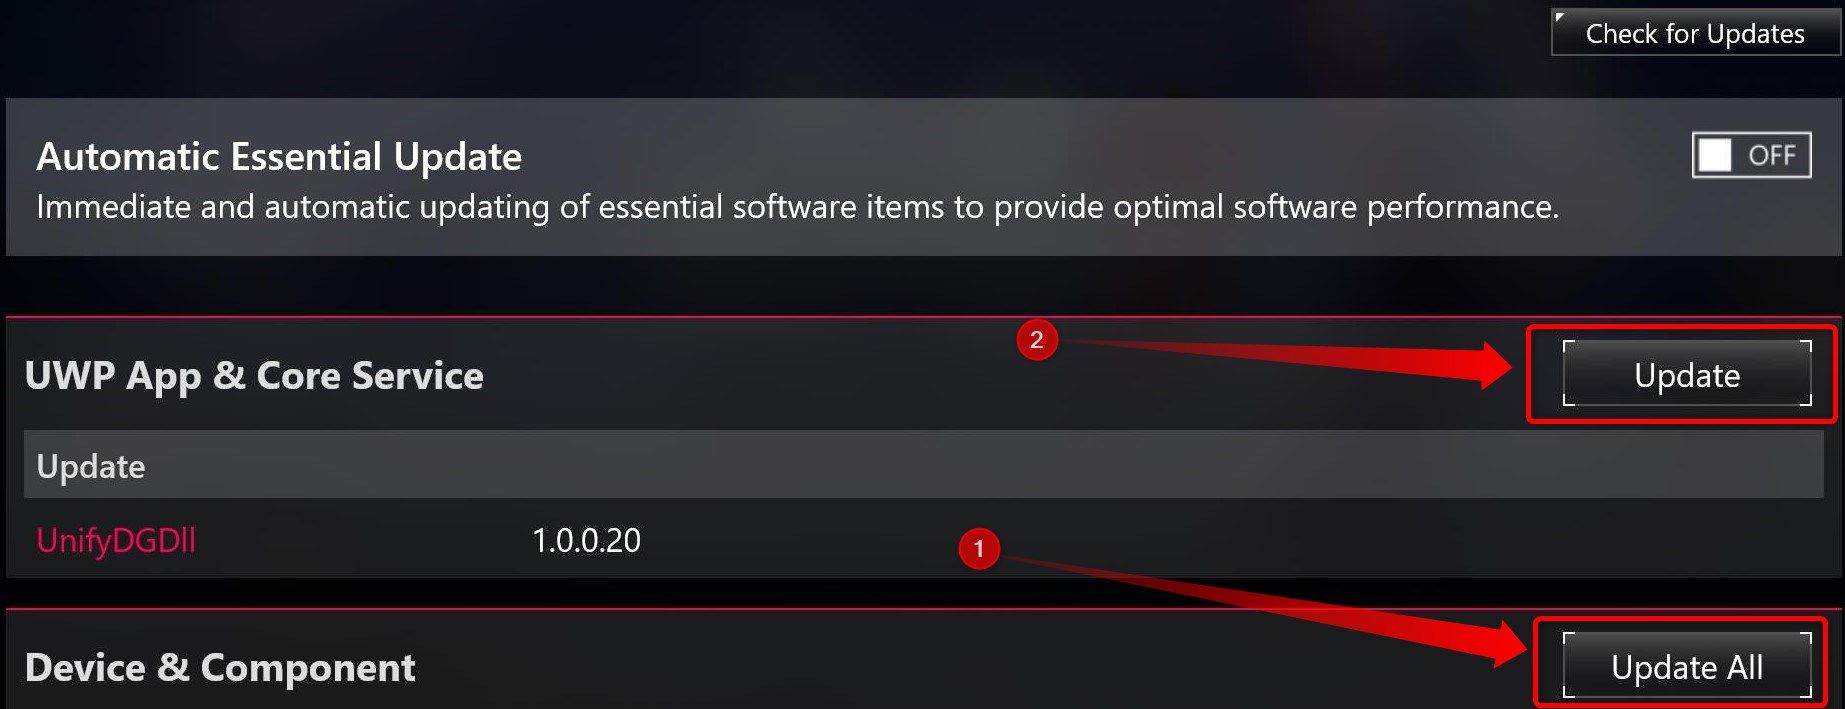
Once inside Armoury Crate, navigate to the “Content” tab and click the “Update Center” button.
Next, you can update “Device and Component” items, which include BIOS and driver updates, as well as Armoury Crate updates. Wait for the “Device and Component” updates to finish (this will involve a couple of restarts) and then update all the items in the “UWP App & Core Service” tab.
Once you’re done with that, it’s time to uninstall Windows bloatware.
Uninstall Unnecessary Apps
Windows 11 comes with a ton of unnecessary apps that take up precious storage and don’t belong on a handheld PC made for gaming. I recommend checking out our in-depth guide on uninstalling Windows 11 apps to purge bloatware off your Ally.
Enable Metered Connection Option in Windows Wi-Fi Settings
Windows 11 is quite eager to install both Windows and app updates automatically. I recommend setting your default Wi-Fi connection as metered to take control of Windows and app updates. Setting your connection as metered prevents automatic Windows updates, including security updates, but it also stops automatic app and Game Pass game updates. If you don’t want to update those manually, skip this step.
Personally, I don’t mind it because I like to check whether the latest Windows update introduces unexpected issues. This can happen more often than you think, especially on the ROG Ally. We’ve got a handy guide on preventing Windows 10 and 11 from automatically downloading updates , which you should read if you want to switch your connection to metered. Just remember that you’ll have to enable a metered connection for every Wi-Fi network you connect to.
After you set your home network as a metered connection, you’ll have to manually update your Windows apps, including Game Pass games. To learn how to do it, read our guide on updating apps on Windows 11 . Note that third-party game launchers, such as Steam, won’t abide by the metered connection rule and will automatically download game updates by default.
Disable Apps From Automatically Starting at Startup
Another irksome thing about most game launchers is that they like to auto-start at boot, which can be pretty annoying after you restart your Ally and find a dozen apps launching at startup, many of which you don’t even use that often. Other apps like Discord, also like to start with Windows by default. Luckily, you can prevent this quite easily.
How-To Geek has a guide on disabling apps from auto-starting on Windows 11 , which you should read if you don’t want to find a boatload of apps auto-starting every time you reboot your Ally.
Disable Core Isolation and Virtual Machine Platform in Windows
Core Isolation and Virtual Machine Platform are two security-related features in Windows 11 that are known to adversely affect gaming performance. You shouldn’t worry about making your ROG Ally prone to malicious attacks when disabling these two options, as long as you use it for gaming.
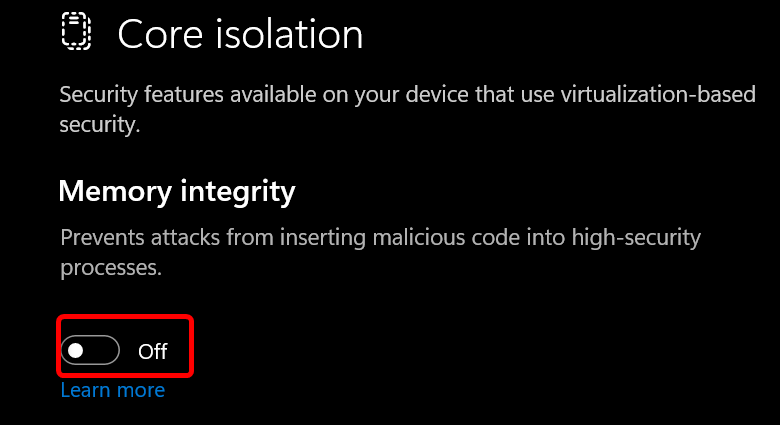
To turn off Core Isolation, type “Core Isolation” in the Windows Search Bar and then click “Core Isolation” once it appears in the list of results. You can summon the virtual keyboard by holding one of the two bottom paddle buttons and pressing Up on the D-pad or pressing the keyboard button located on the taskbar.

Next, toggle the “Memory Integrity” switch off and restart your ROG Ally.
You should know that disabling Virtual Machine Platform can mess up your Windows Hello login options, including PIN and fingerprint recognition. I recommend shutting your ROG Ally down and then turning it back on since a simple restart can cause Windows to bug out and prevent you from resetting your PIN at the login screen.
Another thing to remember is that you might need your Microsoft account password to reset your PIN. Either that or install the Microsoft Authenticator app on your phone, which I find to be the most painless way to perform the whole procedure.
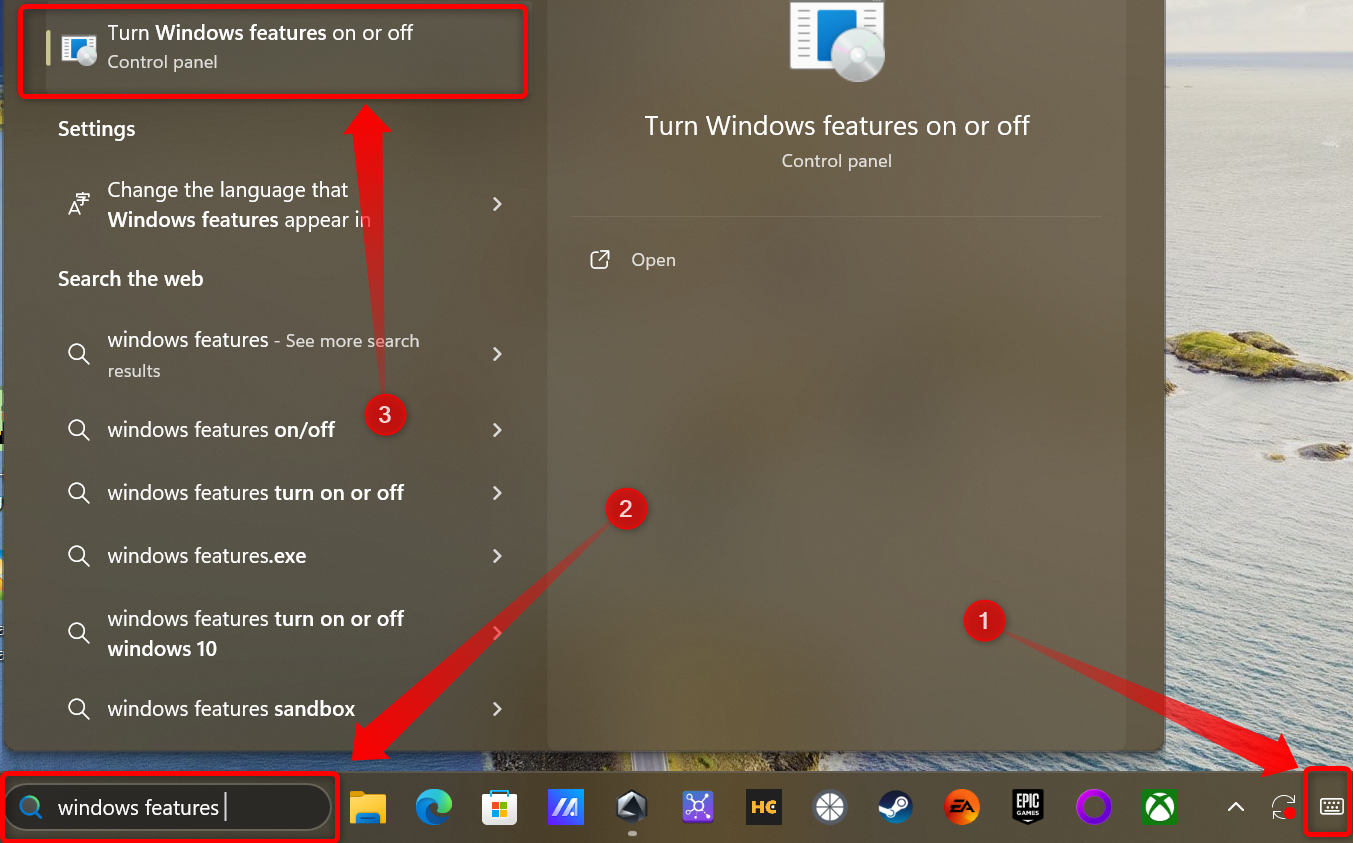
To turn off Virtual Machine Platform, type “Windows Features” in the search bar and then click on the result that reads “Turn Windows features on or off.”
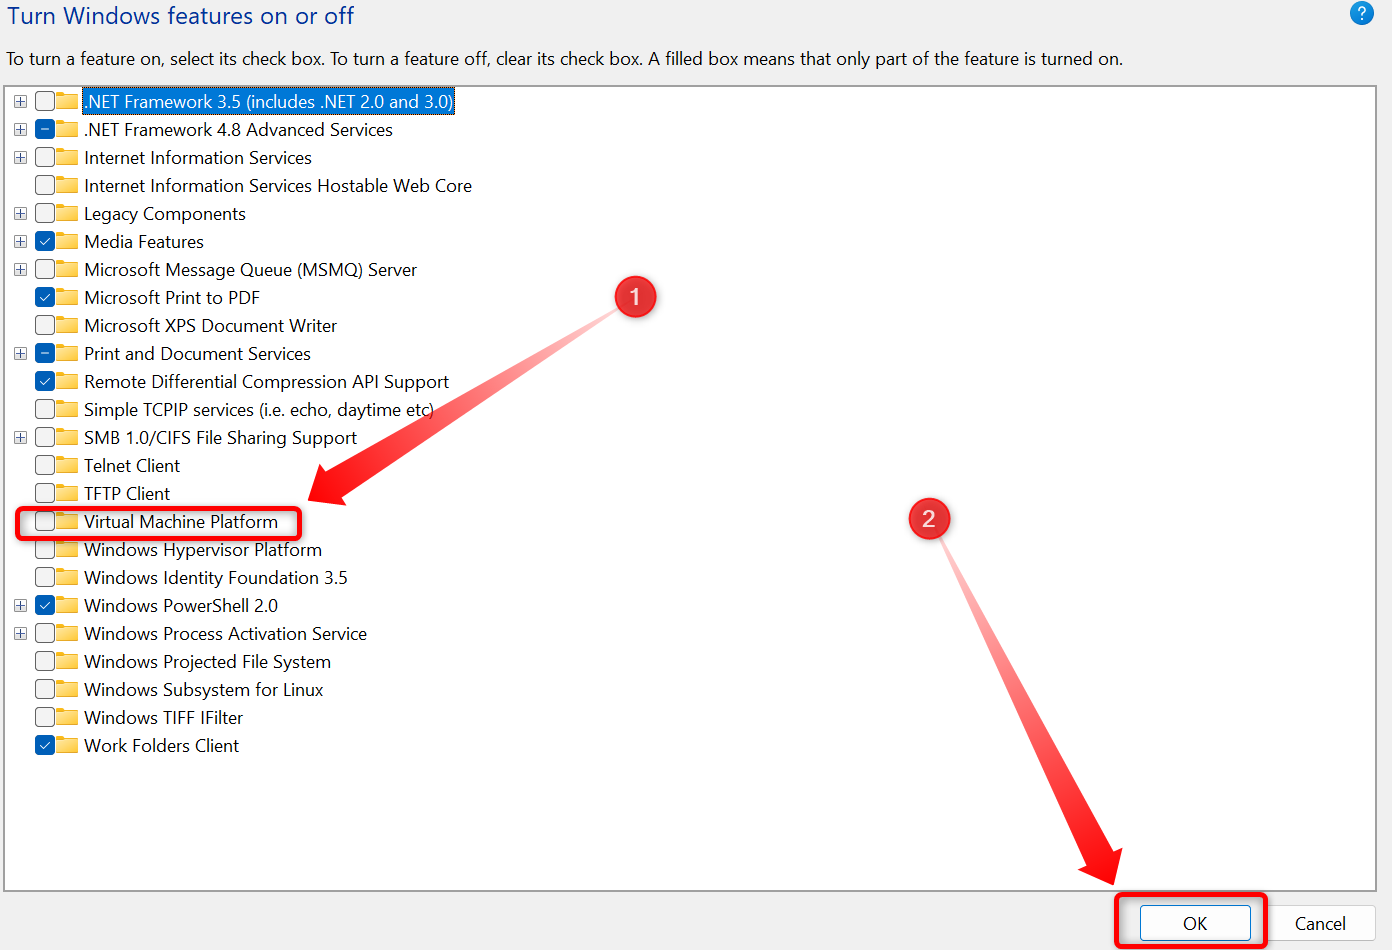
Untick the “Virtual Machine Platform” checkbox in the next window, perform a shutdown, and then turn your ROG Ally back on.
Tweak Buttons and Thumbsticks for a Better Gaming Experience
After you optimize Windows, it’s time to customize the thumbsticks and other buttons to your liking and change the power button behavior.
Change the Power Button Action From Sleep to Hibernate
By default, your ROG Ally’s power button puts the device to sleep. This is less than ideal for many reasons. Sleep uses battery power (not much, but it still slowly depletes the battery over time). Next, the issues with Windows Modern Standby are well documented, and I found my Ally multiple times with a depleted battery after putting it to sleep the day before. Finally, while technically you can pause your game, put the Ally to sleep, and continue where you left off after you turn it back on, this doesn’t work in practice. Either the game bugs out, or the performance drops to a crawl.
The solution is to hibernate your ROG Ally instead of putting it to sleep . Hibernation shuts it down and writes data onto the SSD instead of memory, meaning your Ally doesn’t use battery power while hibernating . This doesn’t negatively affect Ally’s SSD longevity ; it only means your Ally will take a few extra seconds to boot compared to sleep.
Another advantage is that pausing your game and hibernating the device usually lets you continue where you left off without issues. This doesn’t work perfectly, but I’ve found that it works much better than putting my Ally to sleep.
To change the power button behavior from sleep to hibernate, first type “Control Panel” in the search box and open the Control Panel from the results list.
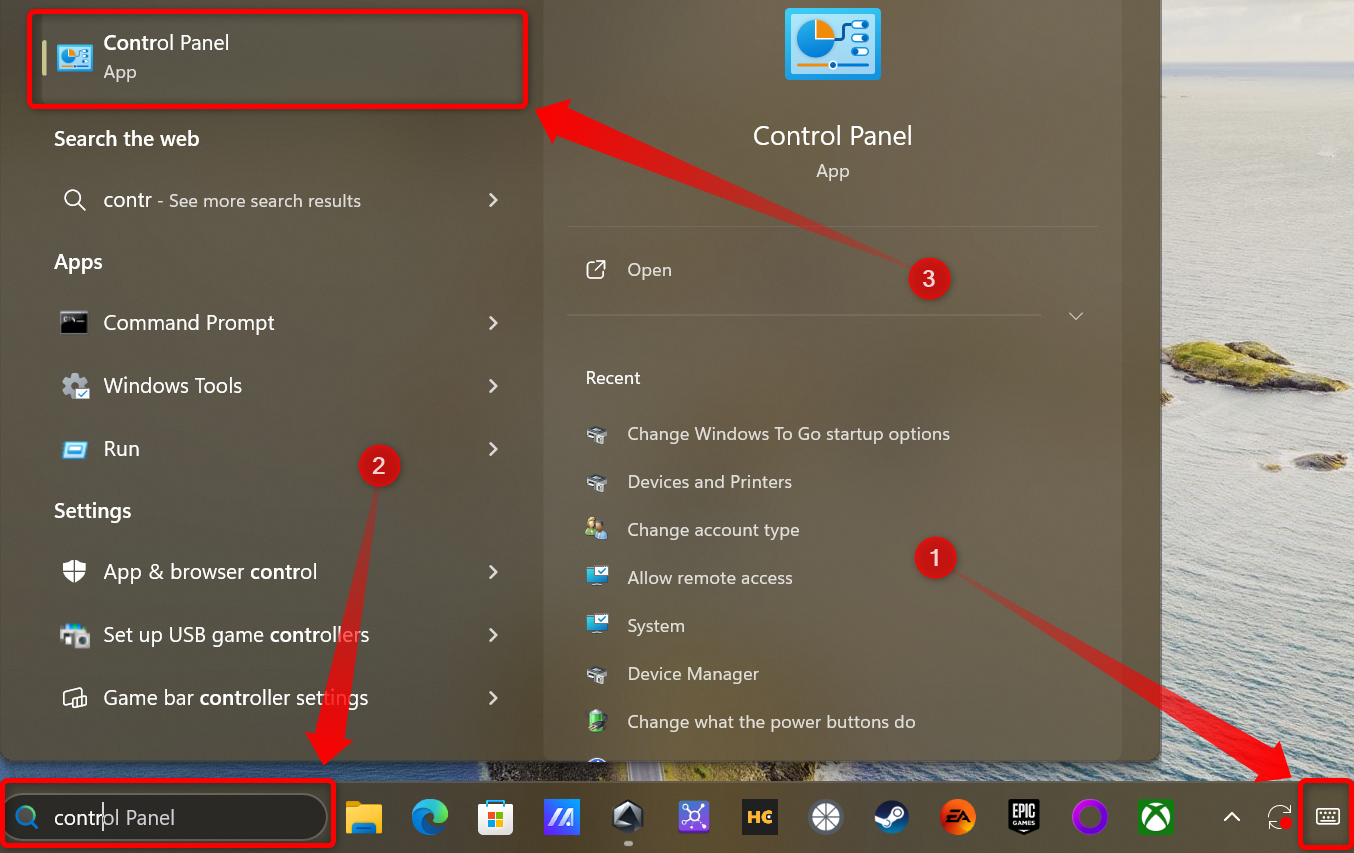
Next, open the “System and Security” tab.
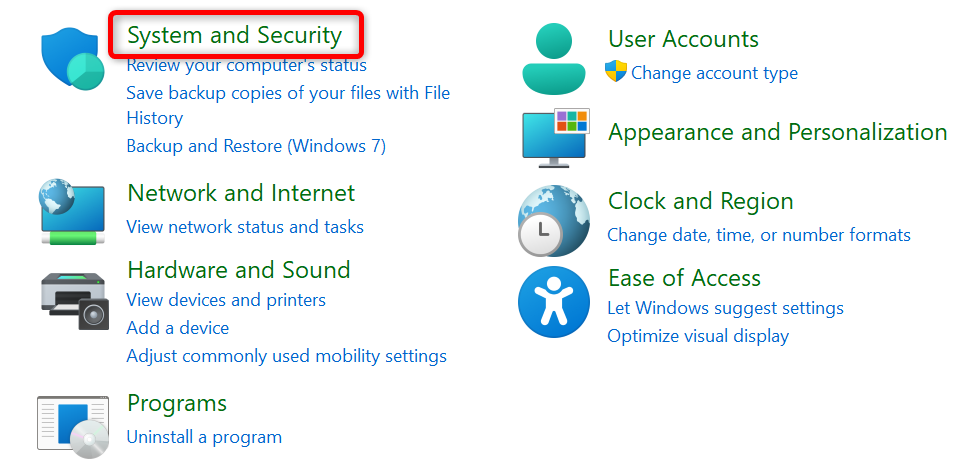
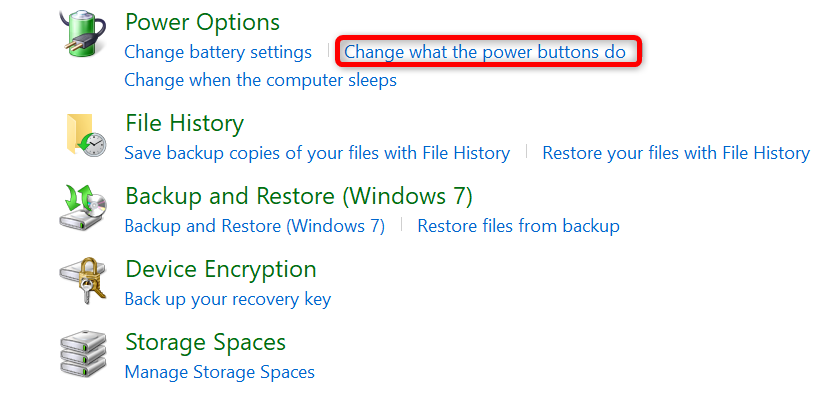
Once there, locate the “Power Options” tab and click the “Change What the Power Buttons Do” option.
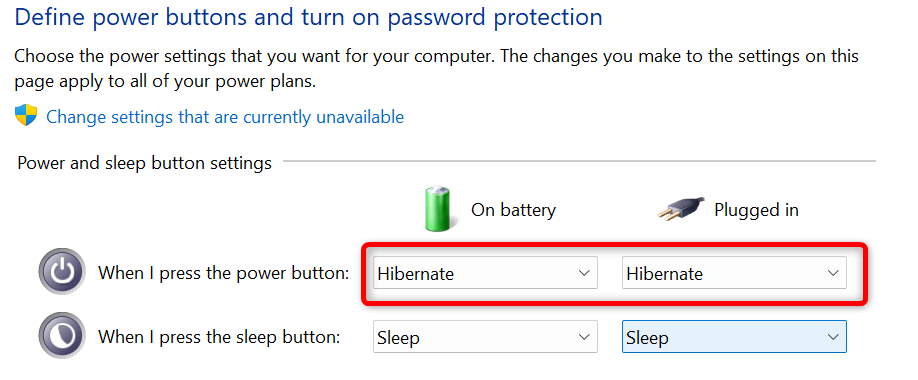
The following menu has an option called “When I Press the Power Button.” Set “Hibernate” when your ROG Ally is on battery and plugged in, and click on “Save Changes.”
Assign Secondary Functions to Controller Buttons
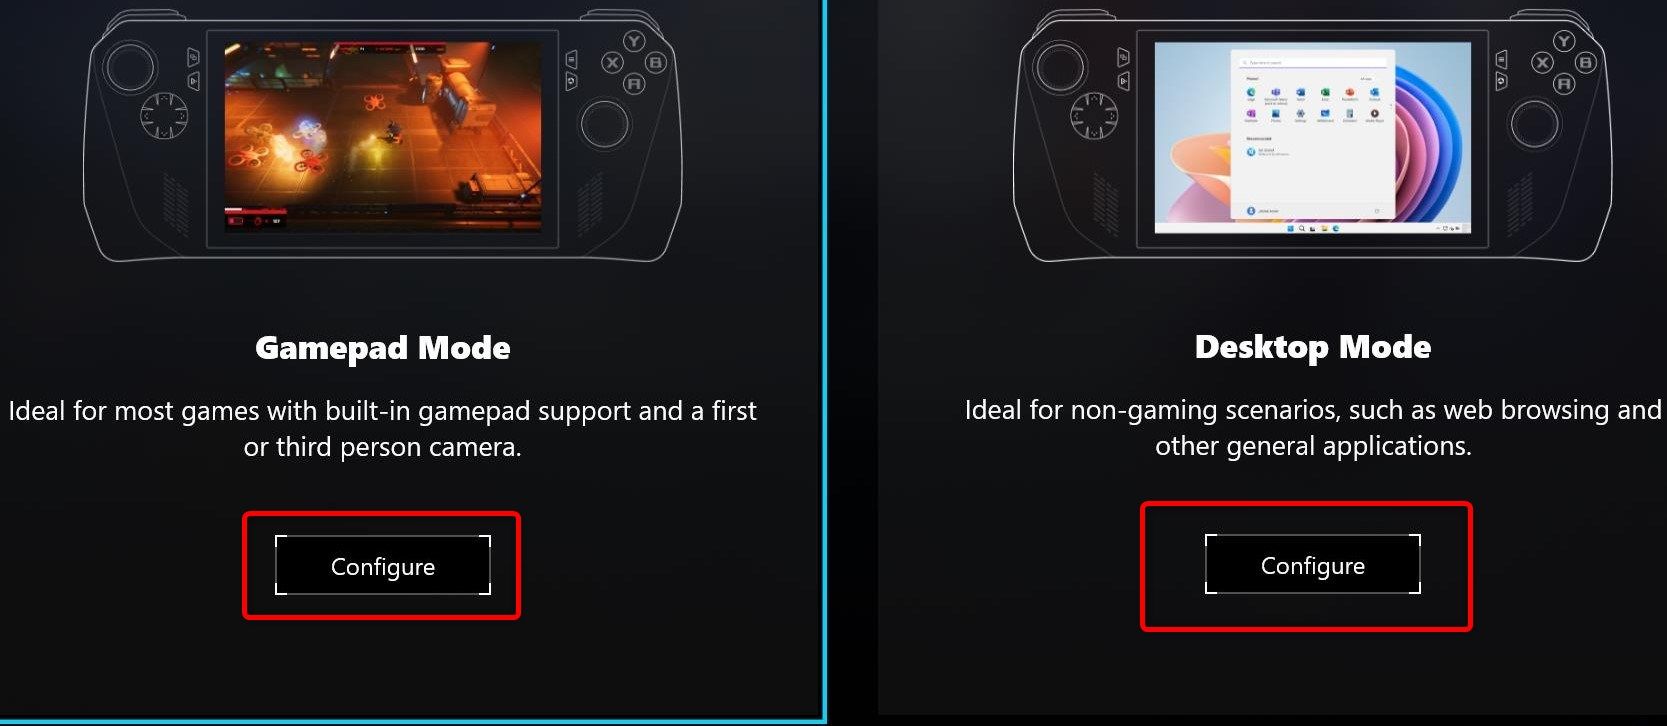
You can assign a secondary function to every button on your ROG Ally. I recommend assigning secondary functions both in “Gamepad” and “Desktop” controller modes, because it makes navigating Windows in Desktop mode much easier and comes in handy when playing games with the controller set to the Gamepad mode.
For example, in RPGs, you can assign the M, I, and J keys to the face buttons, allowing you to do things like quickly access the map, inventory, and quest journal. Another cool use case is mapping the quick save and quick load keys in games that support quick saves, allowing you to save and load without pausing the game.
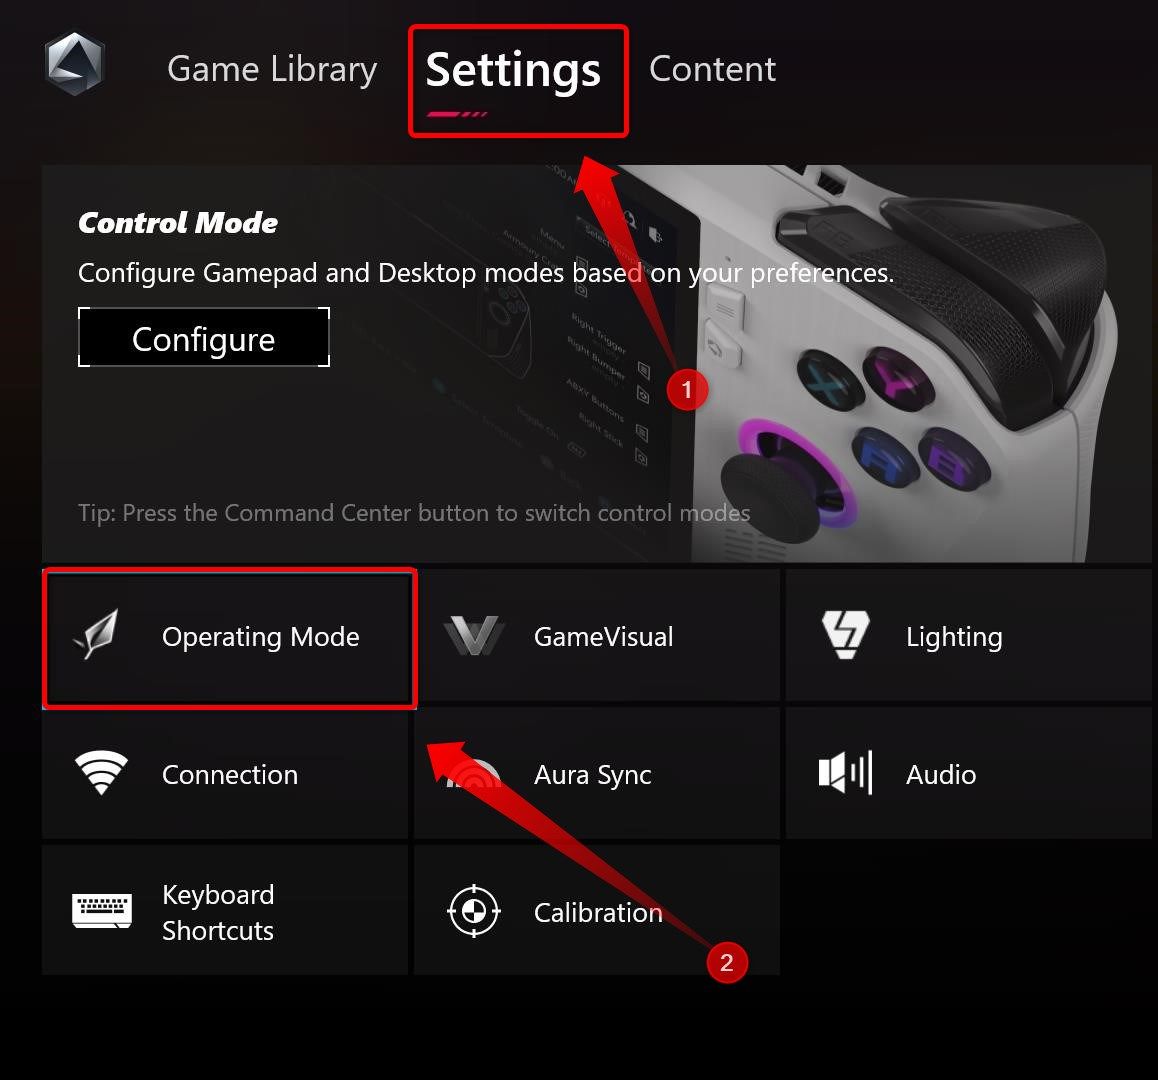
To assign a secondary function to a button, open Armoury Crate, navigate to the “Settings” tab, locate the “Control Mode” option, and click the “Configure” button.
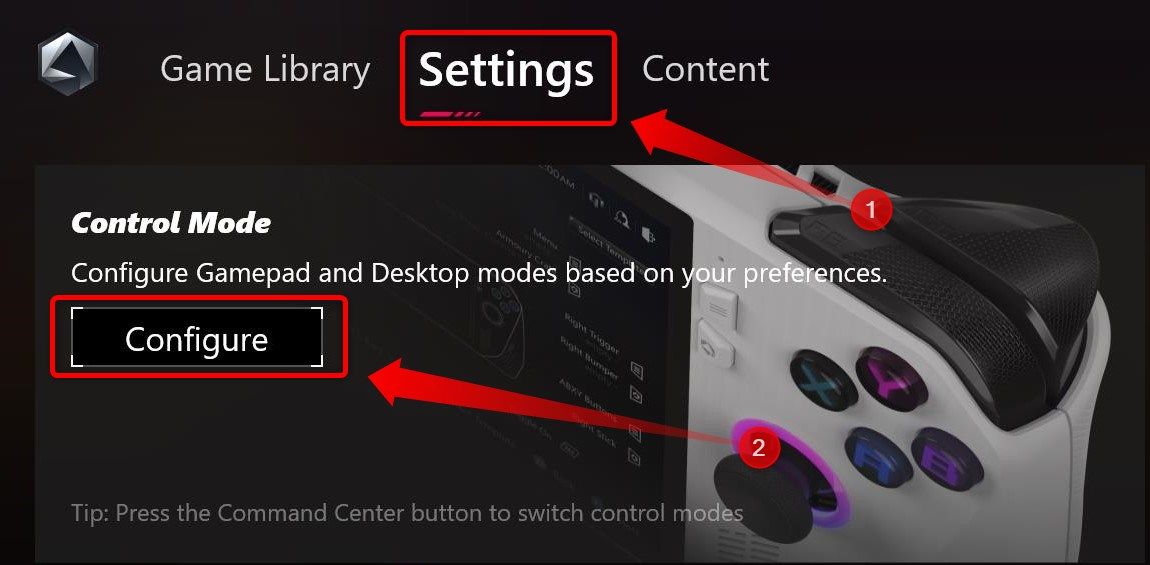
Now, either select “Gamepad Mode” or “Desktop Mode” and press the A button.
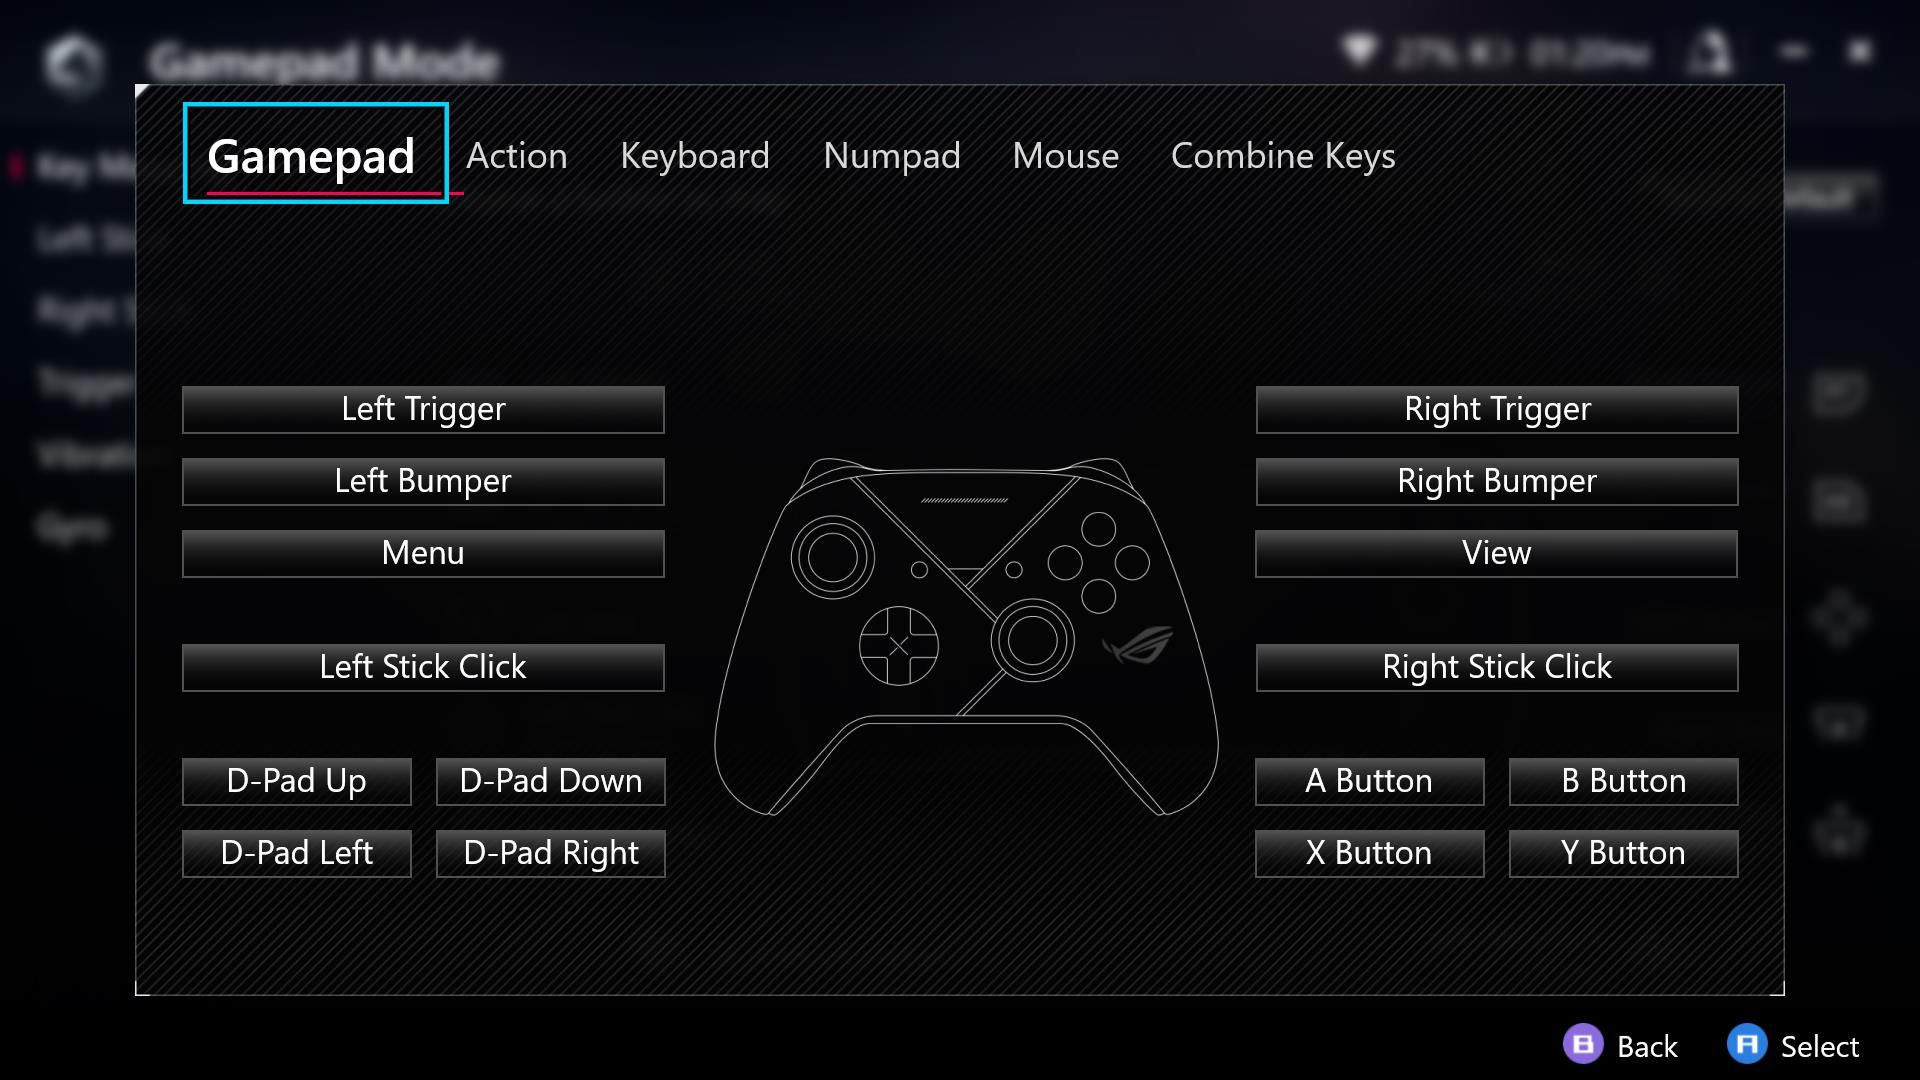
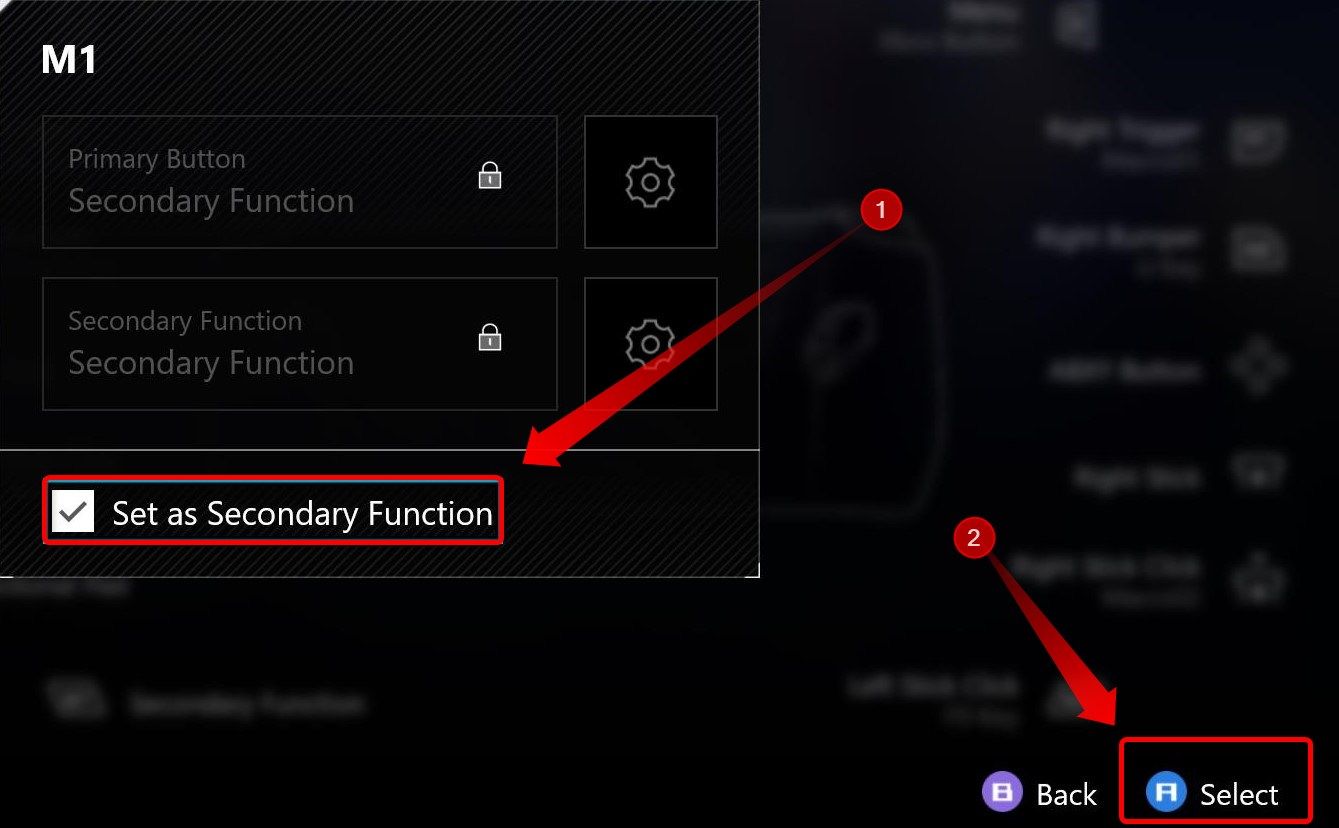
Once in the configuration menu, select any button and press the A button on the controller.

The following menu allows you to assign secondary functions to buttons. To do so, navigate to the “Secondary Function” option and press the A button.
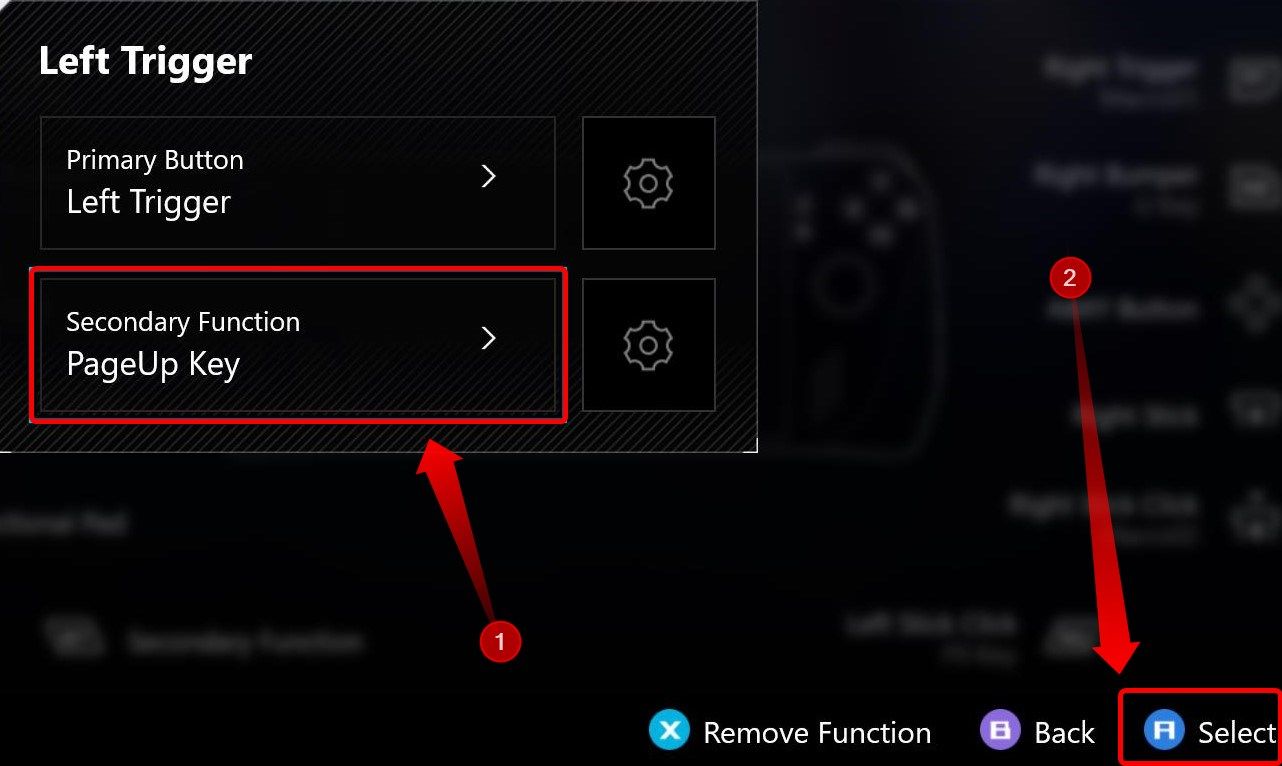
Now, you can assign any function you want to that button. You can pick certain Windows actions, such as showing the virtual keyboard or desktop, any keyboard or mouse key, and even create macros.
Don’t forget that to access secondary button functions, you have to map at least one of the two bottom buttons—marked in Armoury Crate as M1 and M2—as a secondary function modifier. By default, both buttons play the role of modifiers, but if they don’t, for some reason, select either of the two.
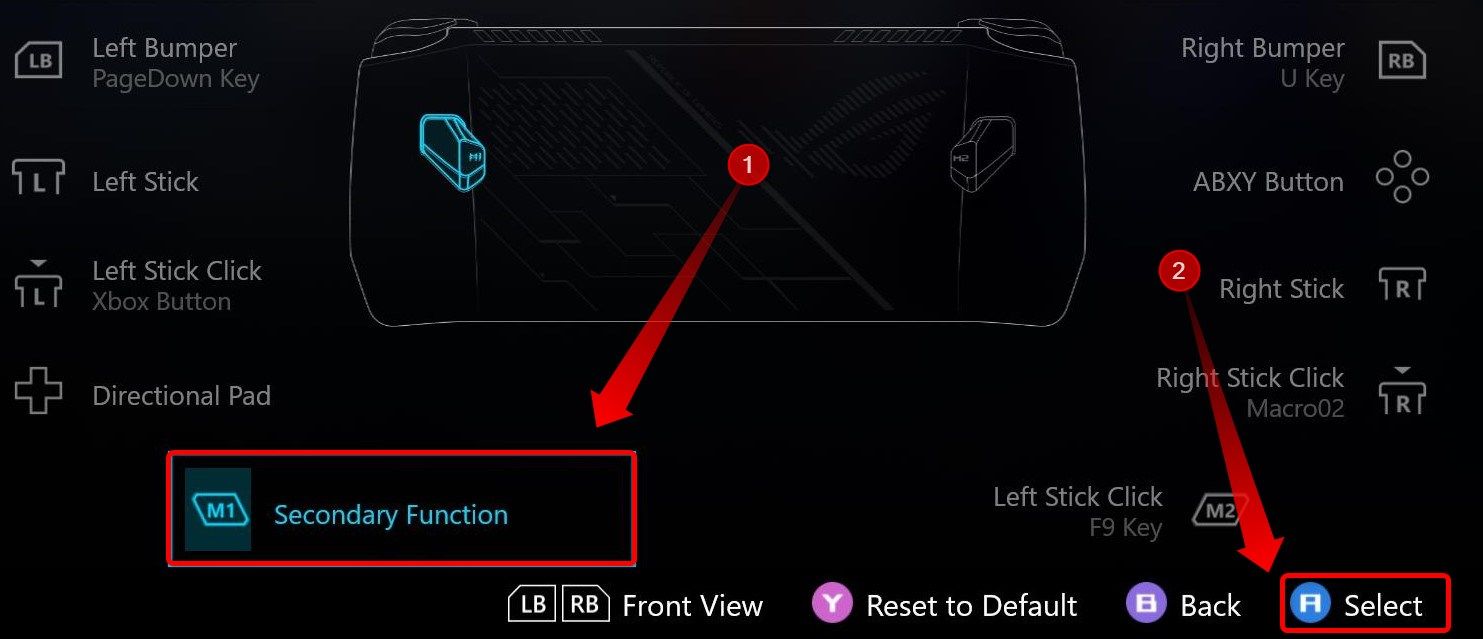
Next, enable the “Set as Secondary Function” checkbox.
Set Custom Control Profiles for Different Games
Not only are you able to assign a secondary function to every button on the ROG Ally, but you can also create a custom controller profile for every game you play.
To do this, select any game in Armoury Crate and press the X button.
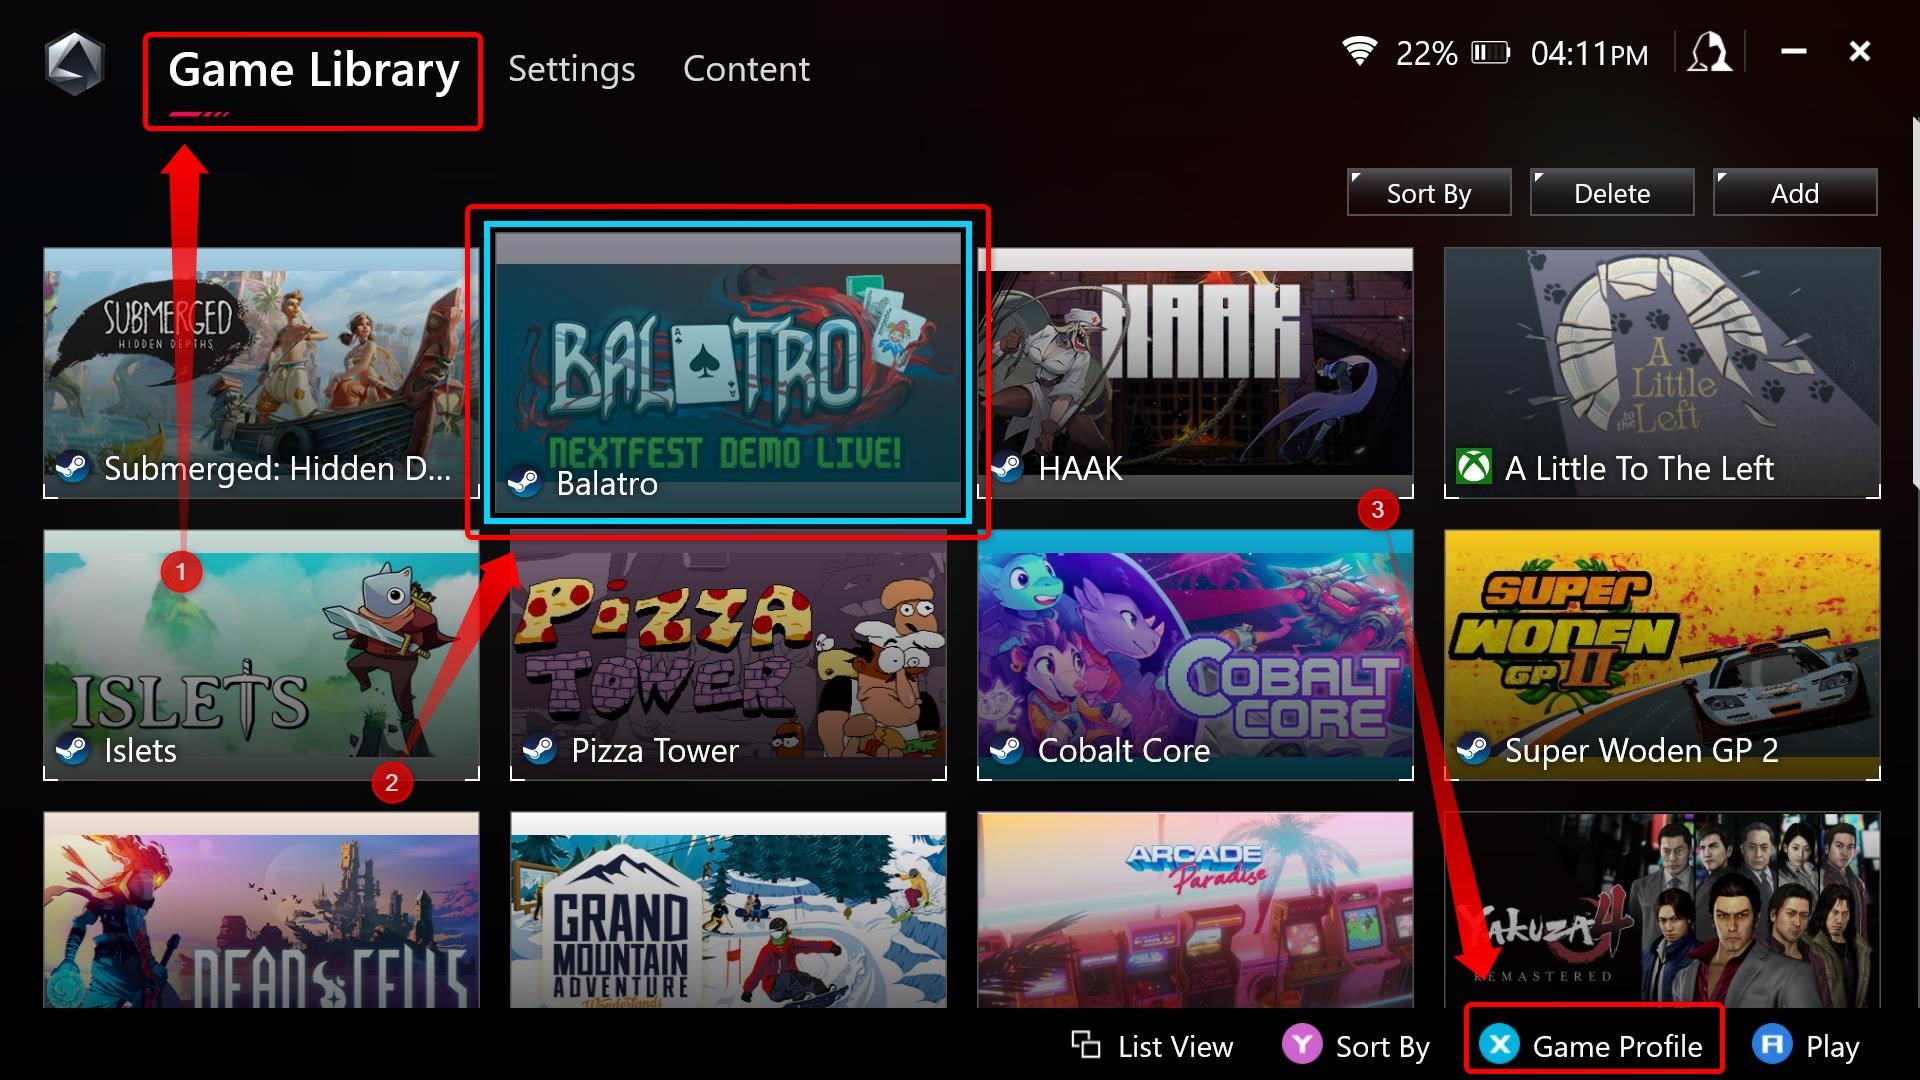
Once you access the game profile menu, you can reassign controls, map secondary functions to each button, and use templates you’ve created for other games by clicking the “Select Template” button.
Customize Thumbstick and Trigger Options in Armoury Crate
If you’d like to adjust thumbstick dead zones and tweak the trigger travel range, enter the control mode you want to adjust—Gamepad or Desktop—and then select one of the two thumbsticks or the triggers.
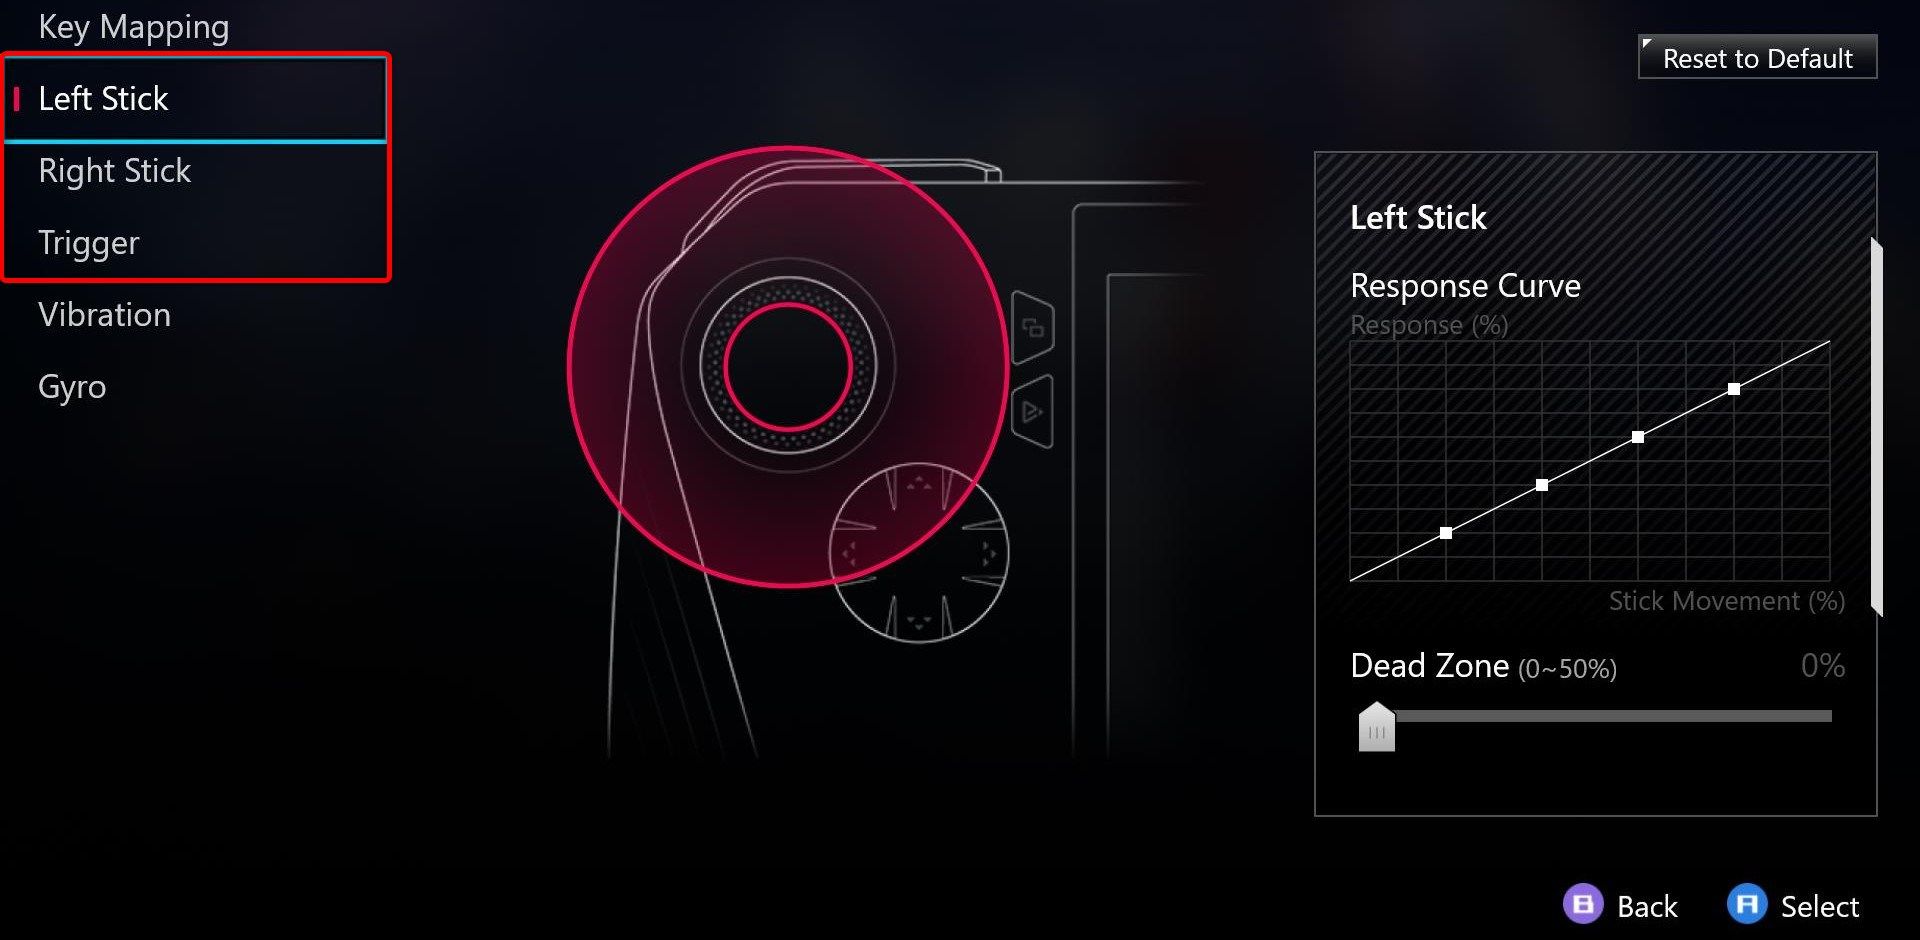
You can also tweak these settings on a per-game basis by selecting a game in Armoury Crate and launching its profile by pressing the X button.
Tips for Boosting ROG Ally Performance and Battery Life
In this section, I’m sharing a few tips that can improve your ROG Ally’s battery life and make games run a bit better.
Go to AMD Software and Tweak GPU Settings
AMD Adrenaline Software app contains global and per-game GPU -related settings. I recommend tweaking some global settings here and also making sure certain options are disabled, as they can impair your gaming experience.
To do this, open AMD Adrenaline, which should be located in the taskbar notification area since it’s set to auto-start at boot by default. If it isn’t, you’ll find it in the Start menu.
Next, go to the “Gaming” tab, select the “Graphics” tab, and set the settings like in the screenshot below. Note that you should disable the “Radeon Anti-Lag’’ option for multiplayer titles. It isn’t worth using at high refresh rates; it’s designed to work best in situations when you’re limited by the GPU.
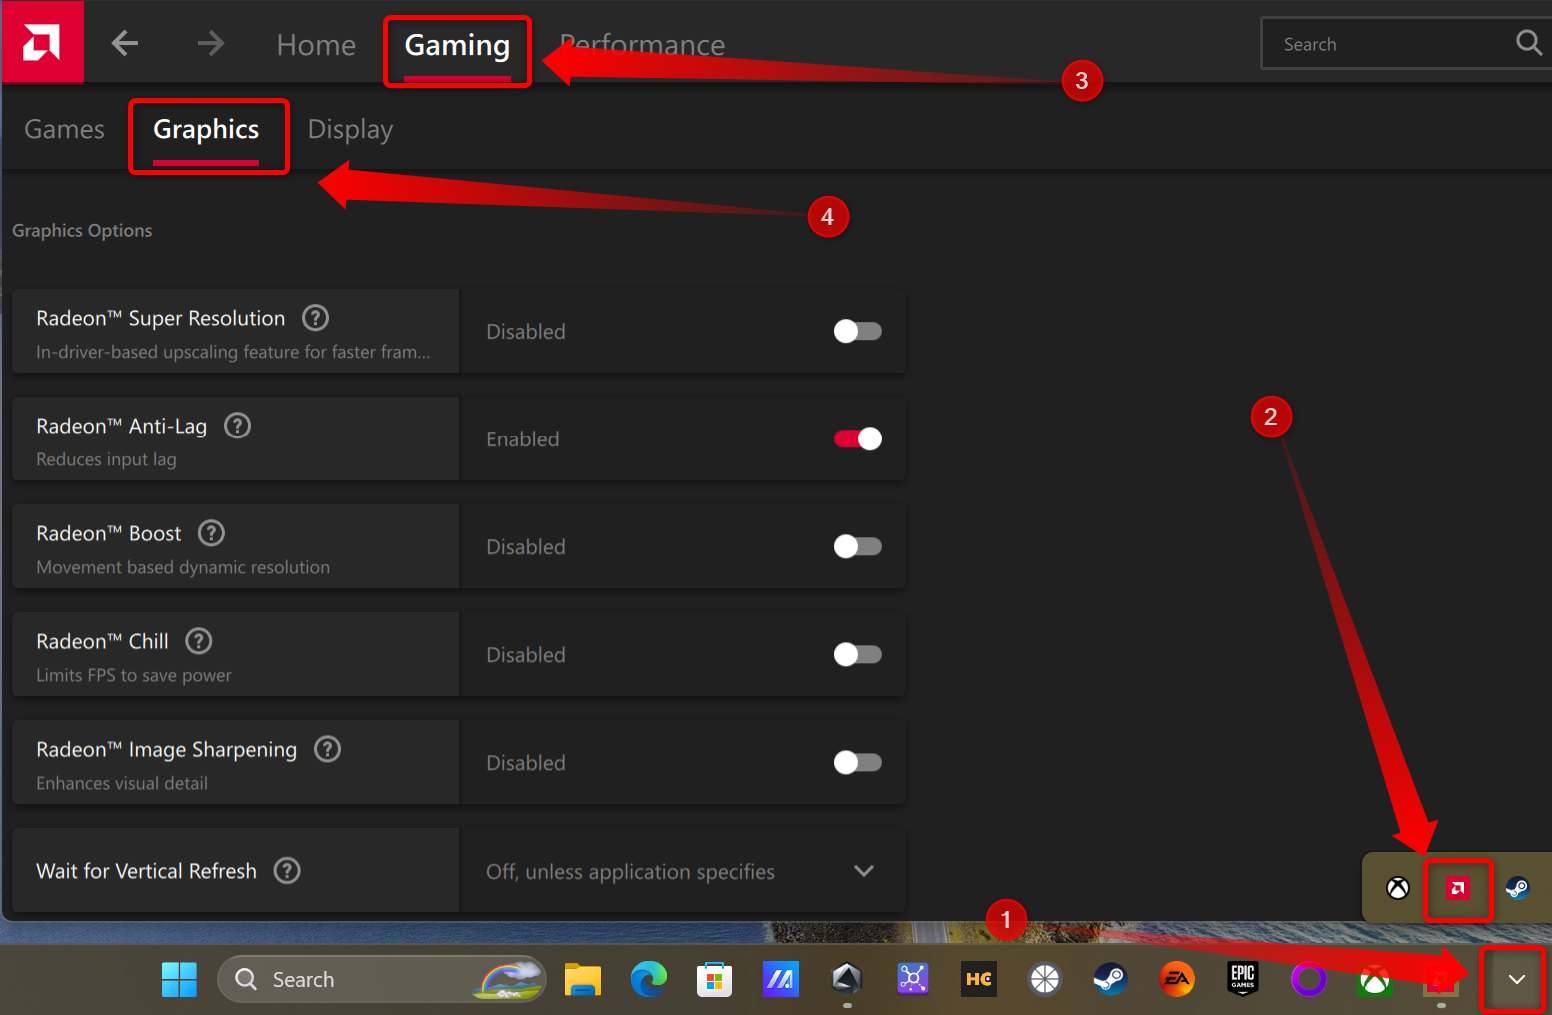
Next, select the “Display” tab, make sure that AMD FreeSync is enabled, and disable the “Vari-Bright” option because it negatively affects color reproduction and maximum brightness. You can set ”Display Color Enhancement” to “Vivid Gaming” if you like your colors extra saturated. Just don’t forget that this can lead to color clipping, which makes different shades of the same color fuse together and degrades the image quality.

Don’t forget that you can tweak these settings on a per-game basis. To do this, go to the “Games” tab, click the game for which you want to adjust settings, and tweak away!

Keep CPU Boost Off by Default
By default, Windows has the CPU Boost feature enabled, allowing the CPU to achieve maximum boost clocks and use more power while doing so. That’s fine for a desktop PC or a gaming laptop, but for a device such as the ROG Ally, keeping CPU boost enabled means less power available for the GPU, more heat generation, and shorter battery life without any noticeable performance advantage in most games.
I recommend enabling CPU boost when using emulators, and when you notice strange performance drops in certain games you cannot alleviate by switching to the Turbo performance mode.
For example, the only two titles for which enabling CPU Boost improved performance for me are Cassette Beasts and HAAK. Both games are non-demanding indie titles that are limited to a single CPU thread , meaning they run better when that sole CPU core utilized by the game can reach maximum clocks. You can also enable CPU Boost when using the Turbo power profile because in that case there’s enough power around—25W on battery, 30W when hooked to a charger—for both the CPU and GPU.
You can easily toggle CPU Boost in the Command Center, which you can launch by pressing the Command Center button located under the View button, on the left side of the device.
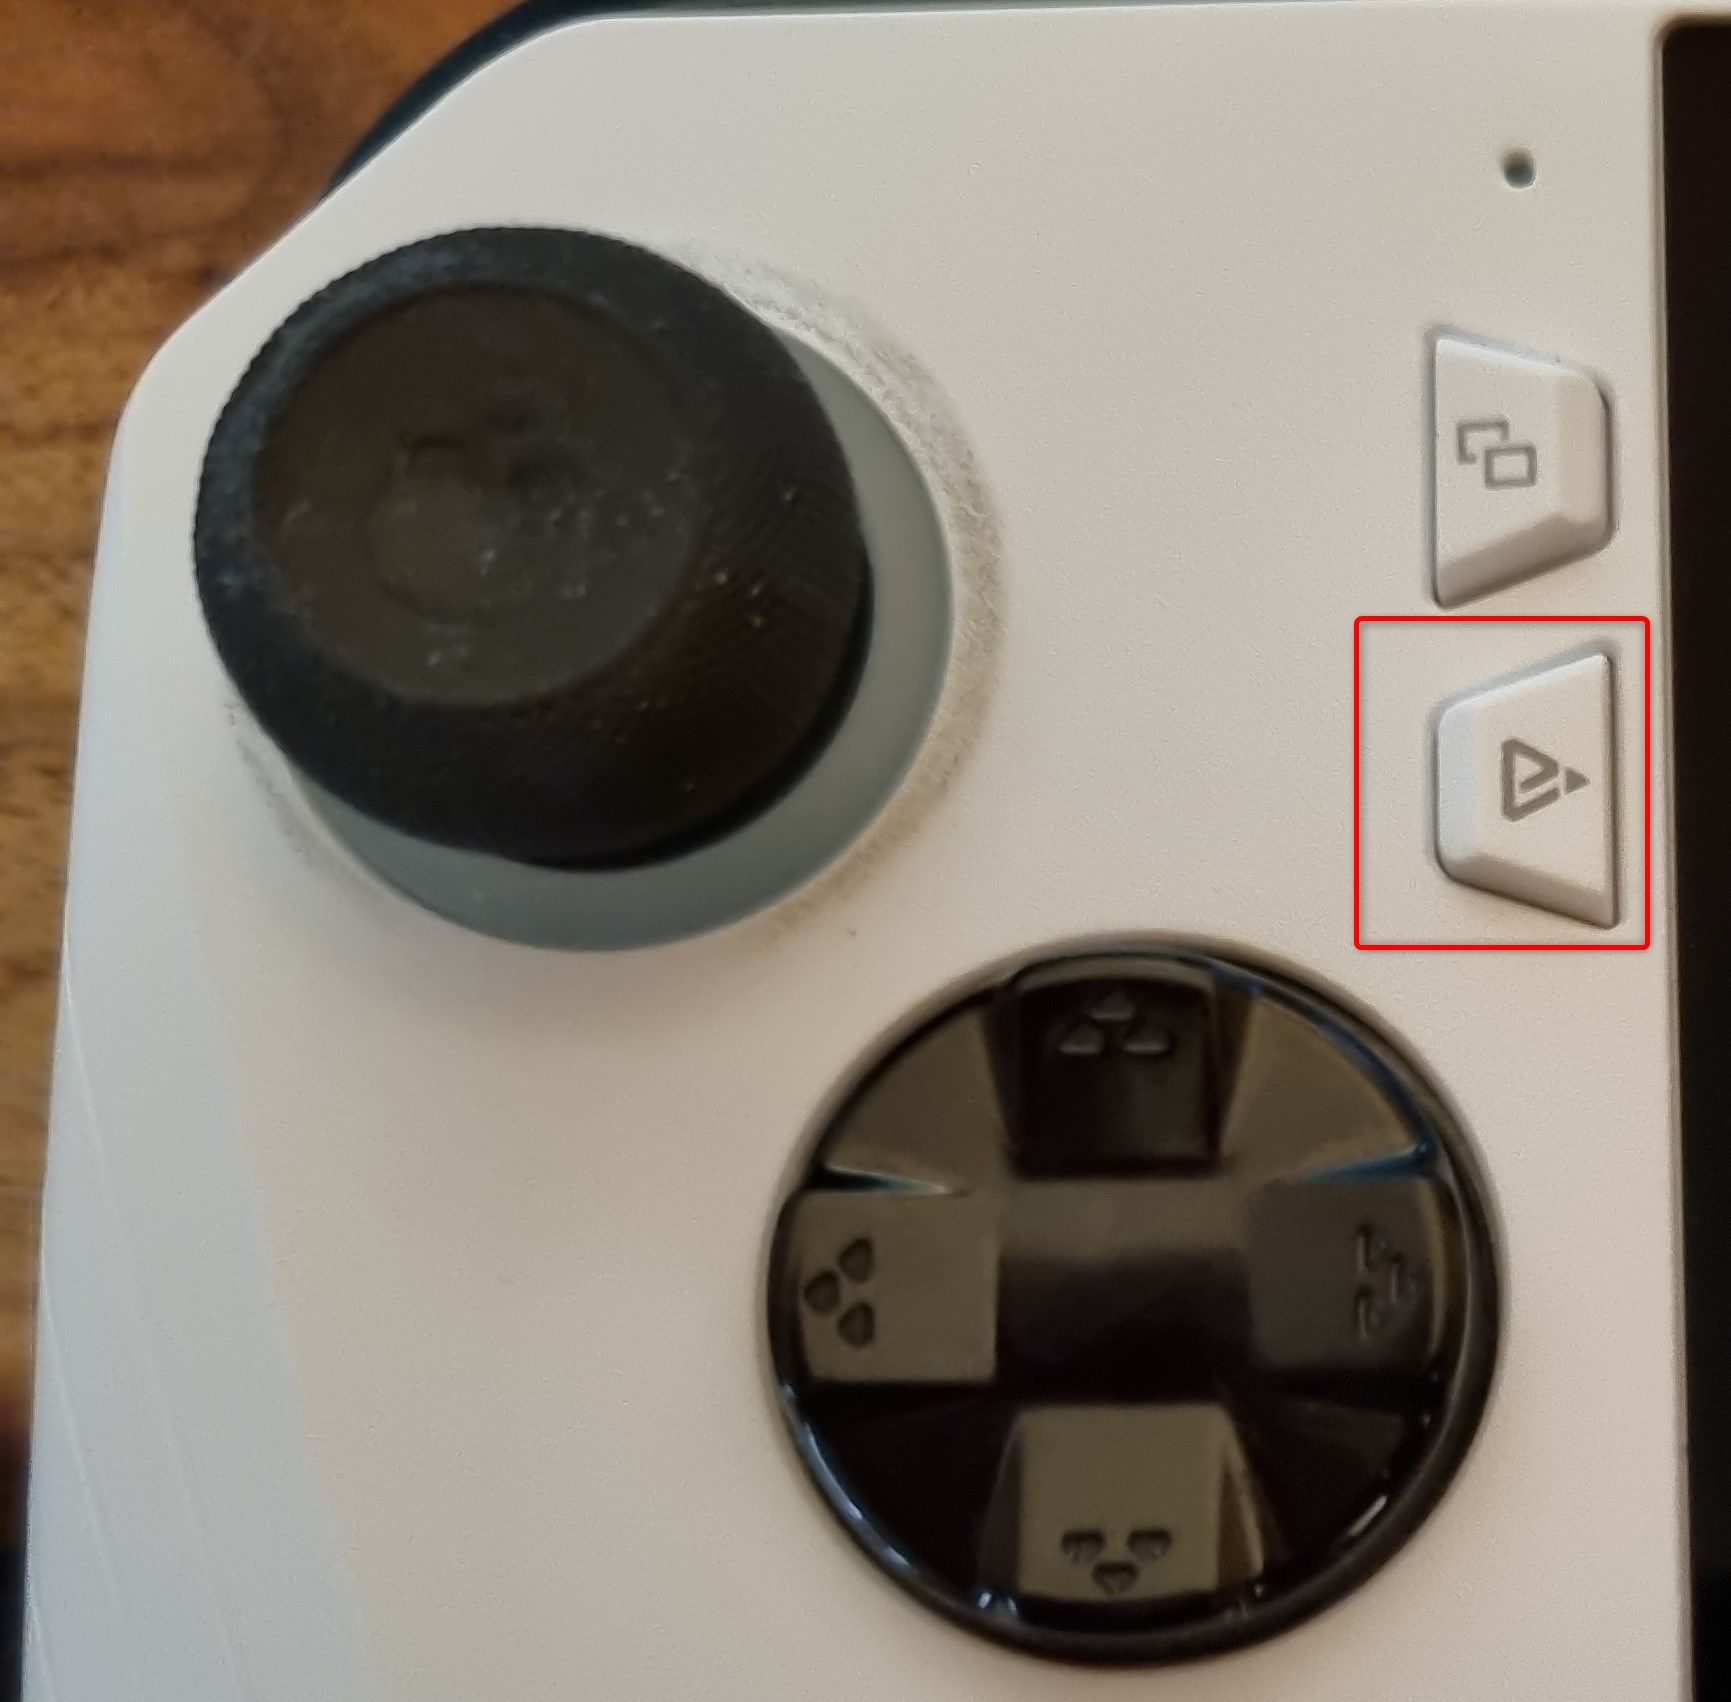
Goran Damnjanovic / How-To Geek
Once there, just locate the “CPU Boost” button and enable or disable the option.

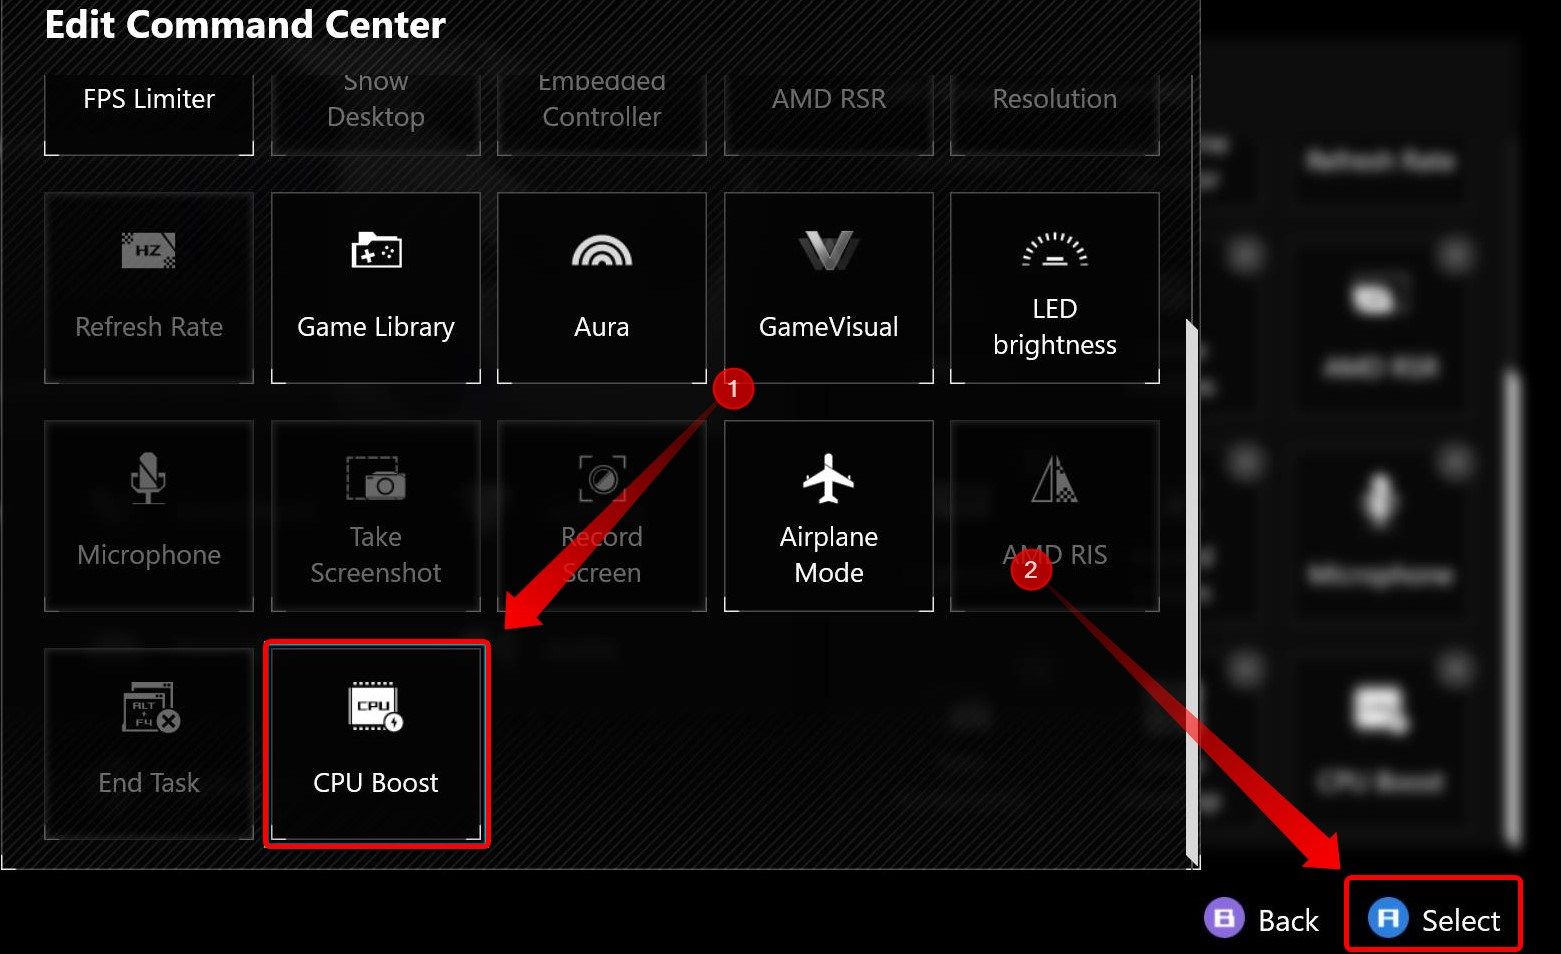
If you cannot find the “CPU Boost” toggle, open Armoury Crate, go to the “Settings” tab, and click any of the buttons in the “Edit Command Center” menu you might find unimportant to have in the Command Center panel.
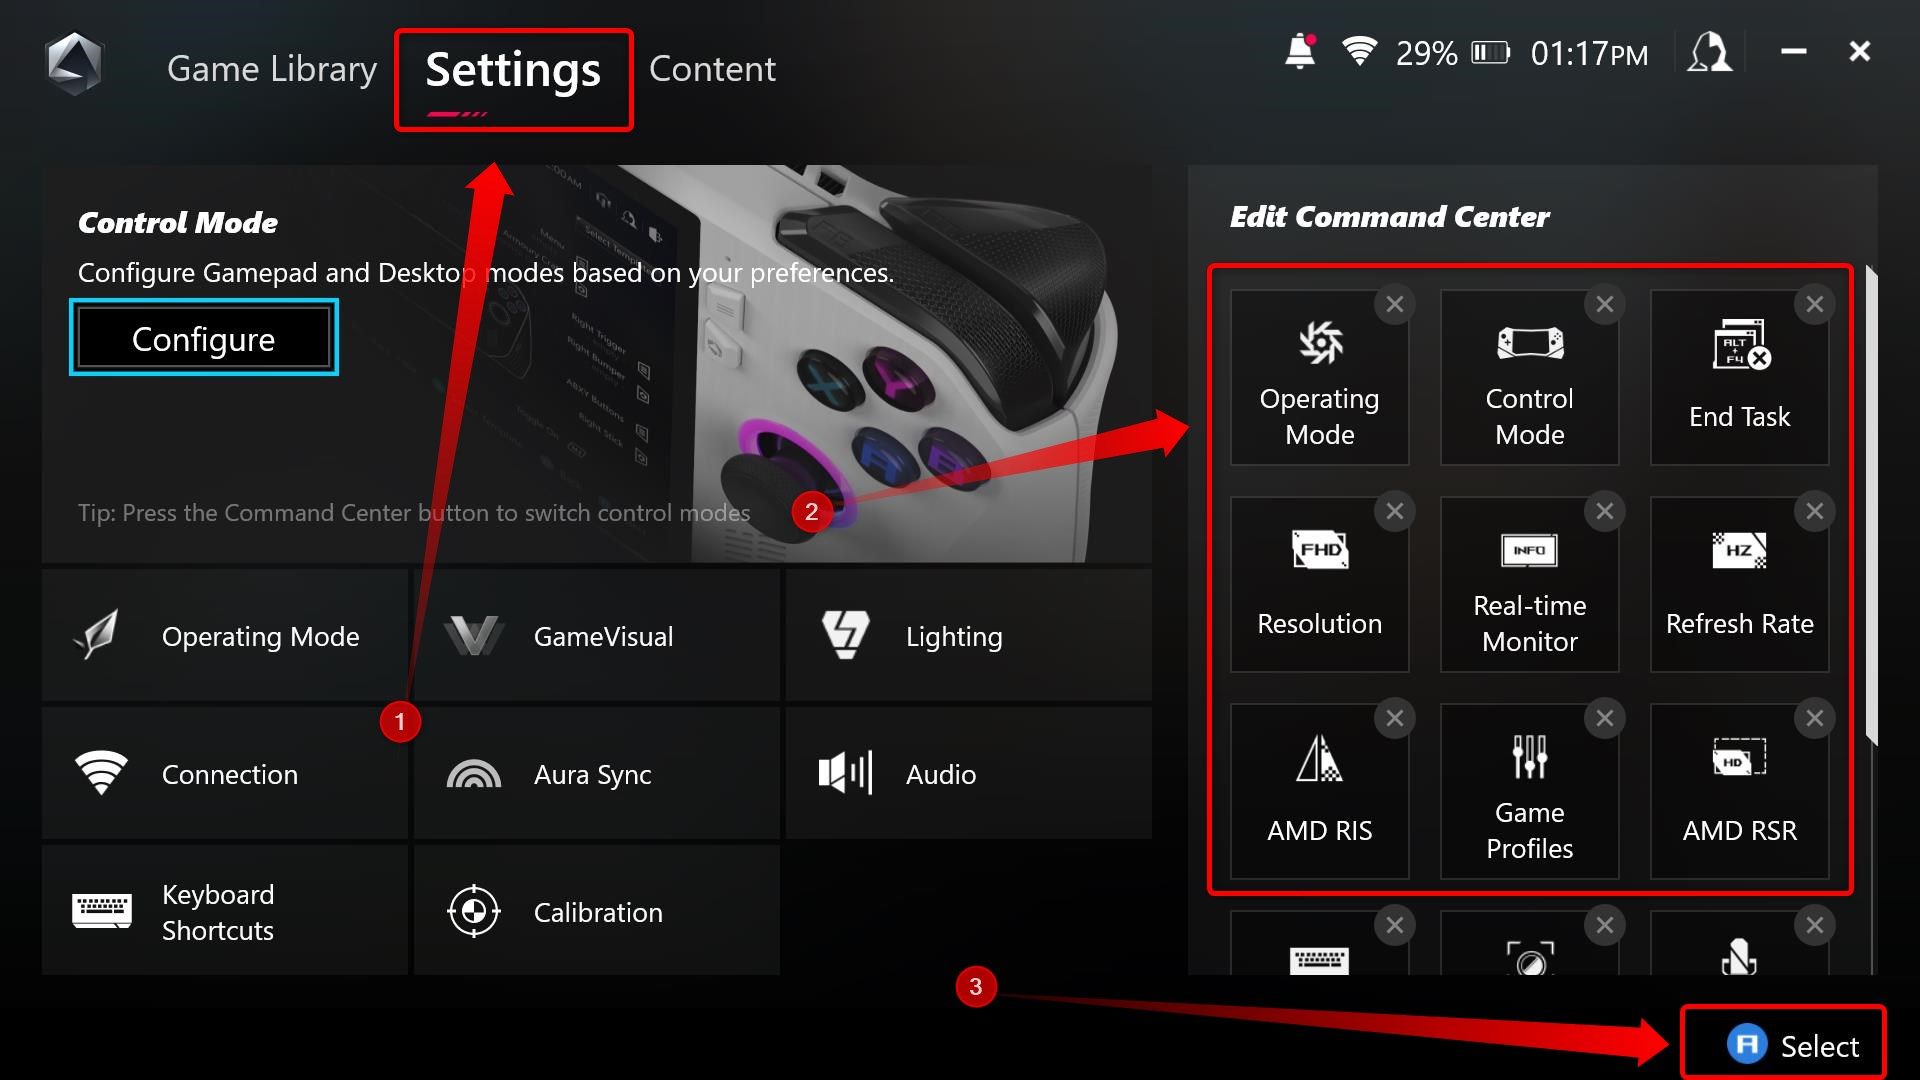
Next, replace the button with the “CPU Boost” toggle.
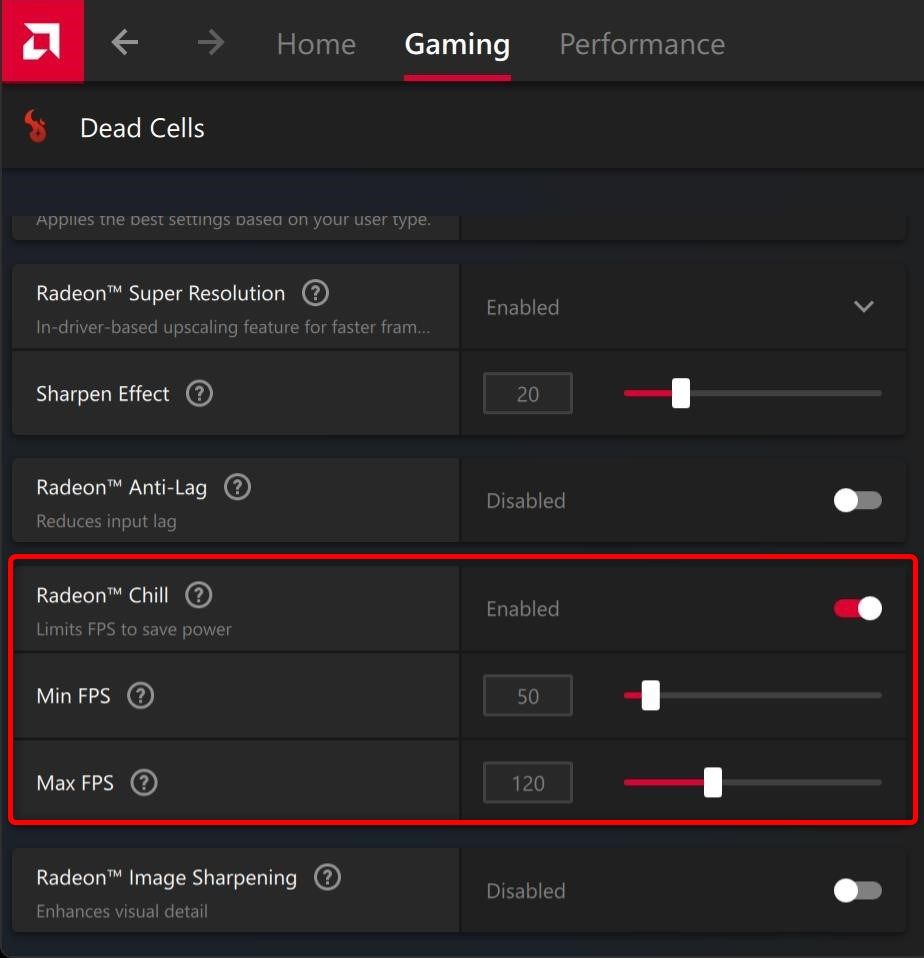
Limit In-Game FPS With Radeon Chill Instead of the Built-in Frame Limiter
Limiting your frame rate is a better way to improve battery life than setting your ROG Ally’s refresh rate to 60Hz, because the latter disables FreeSync . The issue here, is that the built-in frame limiter doesn’t work as it is supposed to in most cases.
I recommend limiting the frame rate in games with a feature in AMD Software called “Radeon Chill” instead. All you have to do is open AMD Adrenalin Software, select the “Games” tab, and open the game you want to limit the frame rate in.
Next, scroll down until you see the “Radeon Chill” option, enable it, and tweak the max frame rate to your liking.
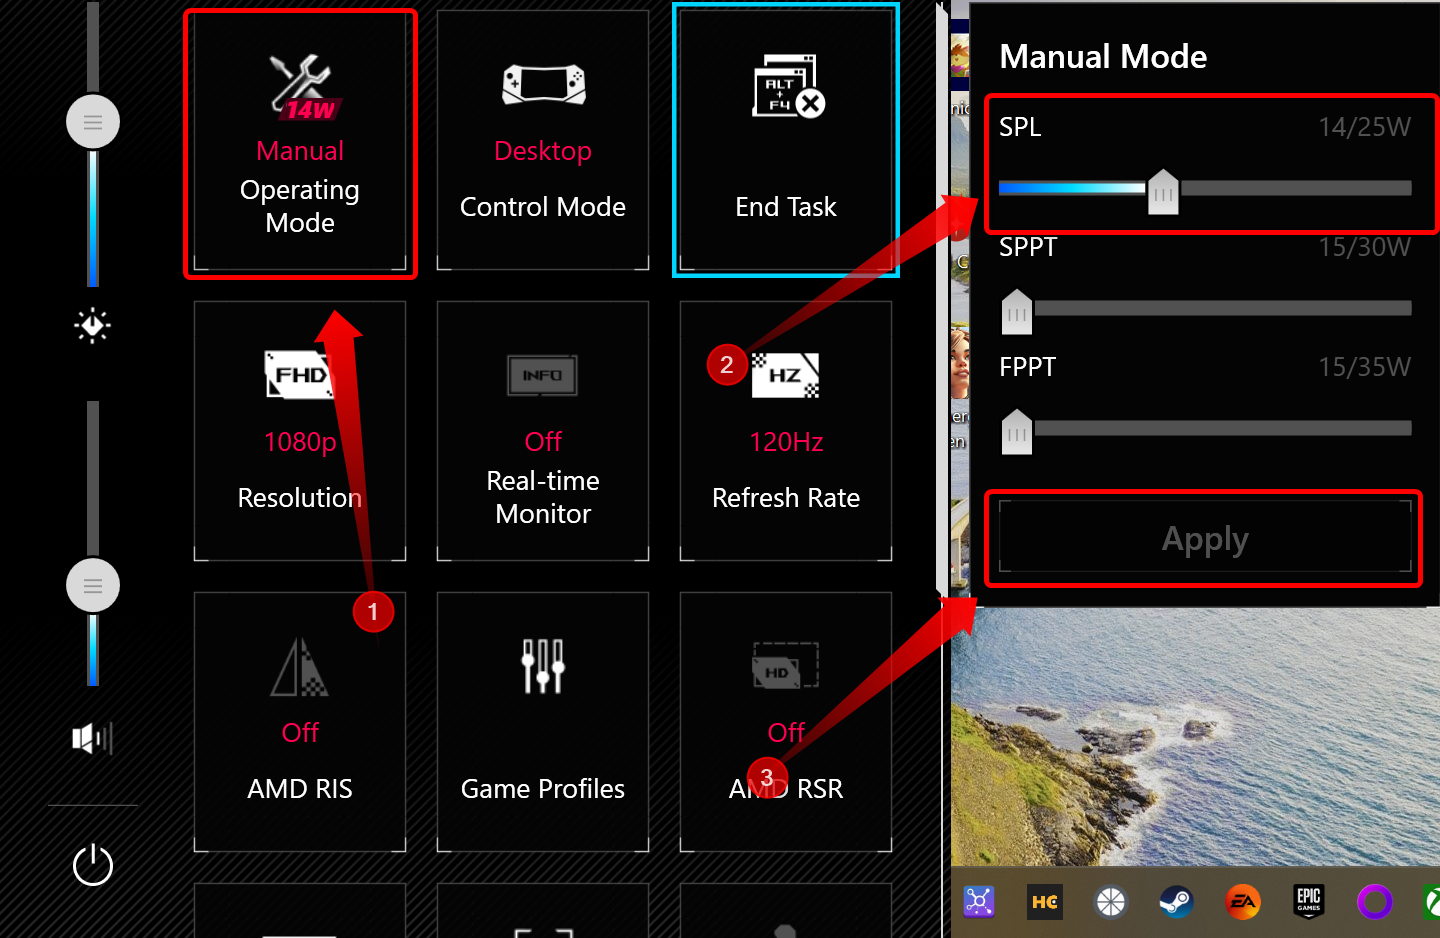
Custom TDP Profiles Are Great for Improving Battery Life
The ASUS ROG Ally comes with three pre-built performance profiles: Silent (10W), Performance (15W), and Turbo (25W on battery, 30W when plugged in). The fourth profile, Manual, lets you set a custom TDP to your liking. I recommend using the Manual profile to get the best battery life.
For example, most older and less demanding 3D games (and some 2D games) don’t work great with the Silent profile. Instead of upping the profile to Performance at 15W, you can select the Manual profile and slowly increase the TDP until you’re satisfied with performance. From my experience, most games work fine when using a TDP of between 12W and 14W. On the other hand, 18W is the sweet spot for more demanding games.
To activate the Manual power profile, open the Command Center, switch between performance profiles until you reach the “Manual” profile, set the desired TDP by using the slider to the right—you can disregard the second and third slider—and press “Apply.”
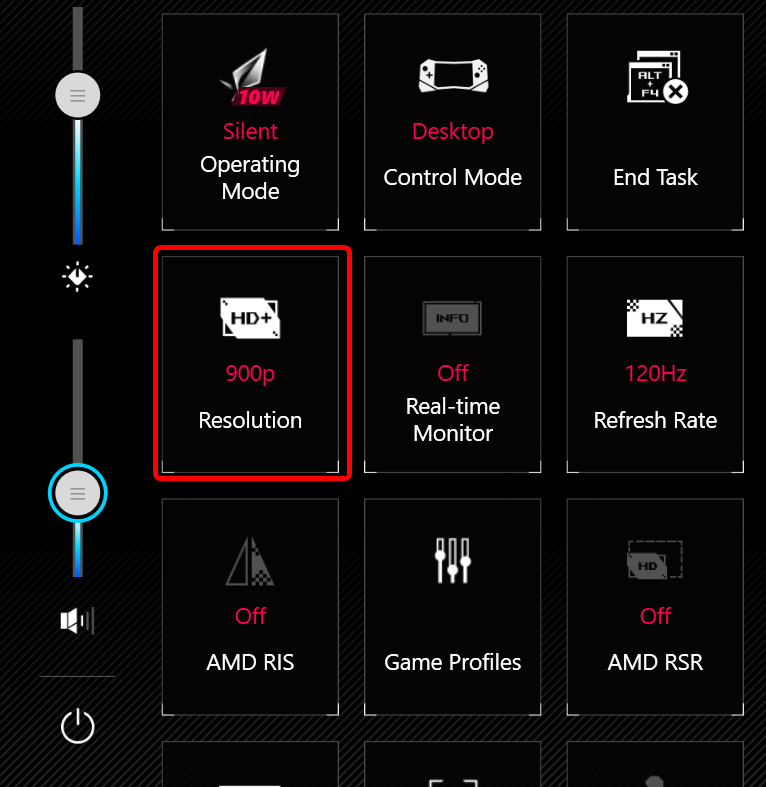
Use 900P Instead of 1080P for Better Performance and Longer Battery Life
Another way to improve battery life is to decrease resolution. The 900p resolution is the sweet spot, but you can go as low as 720p if you want. To change resolution, open the Command Center, locate the resolution button, and switch from 1080p to either 900p or 720p.
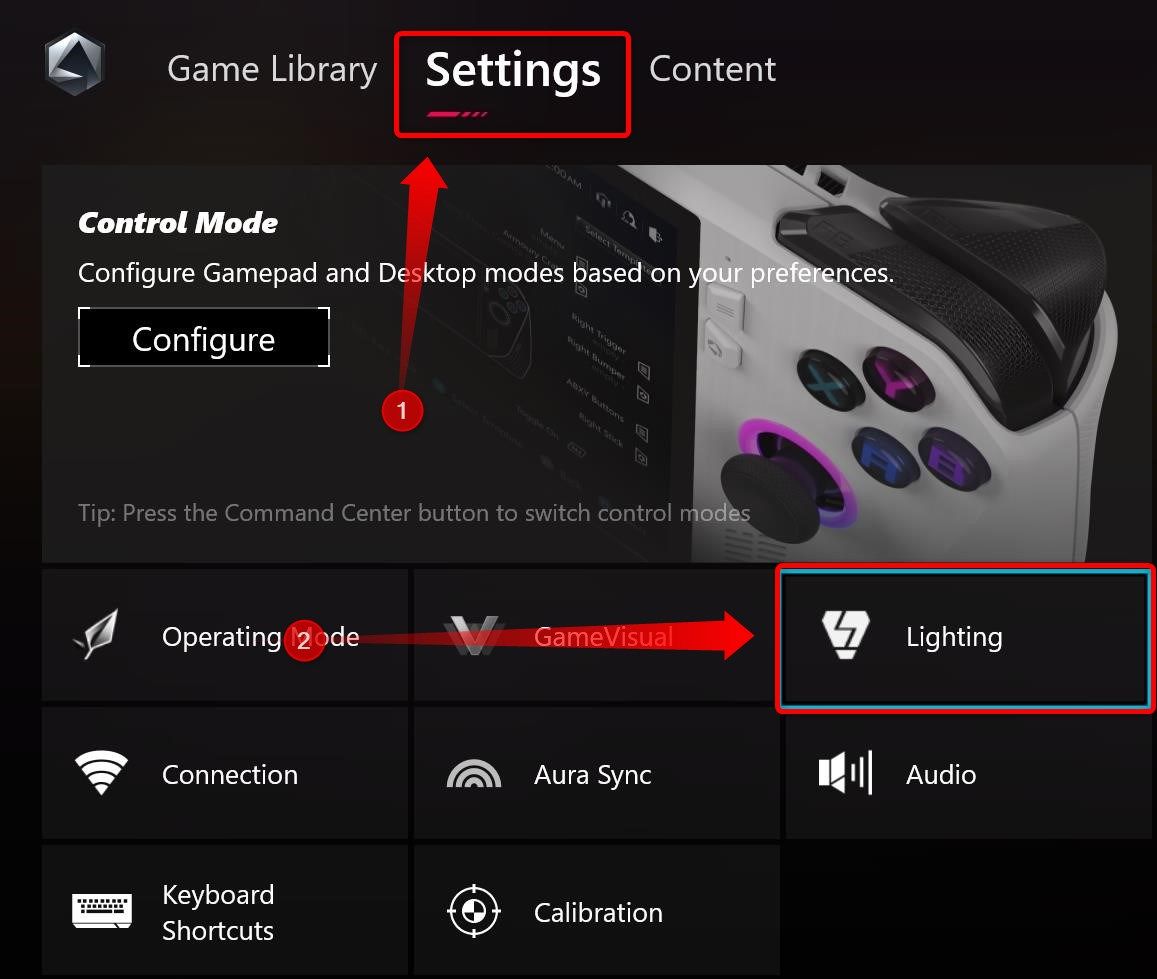
Turn Off Thumbstick RGB
By default, the analog sticks on the ROG Ally light-up, but you can turn off RGB to save power or if you aren’t a fan of RGB. You can find the setting in Armoury Crate > Settings > Lighting.
Once there, select the “Settings” tab and switch all options listed there to “Off.”

Tweak VRAM Allocation
Since the ROG Ally comes with an integrated GPU , the GPU uses a portion of the RAM as its video memory. The VRAM is set to 4GB by default, but some games don’t play nice with only 4GB of video memory. You can increase VRAM allocation up to 8GB if you experience issues with certain demanding titles.
To change VRAM allocation, open Armoury Crate > Settings > Operating Mode.
In the Operating Mode menu, select the “GPU Settings” tab, click the “Memory Assigned to GPU” drop down menu, and tweak the setting to your liking. Then restart your Ally to apply changes.
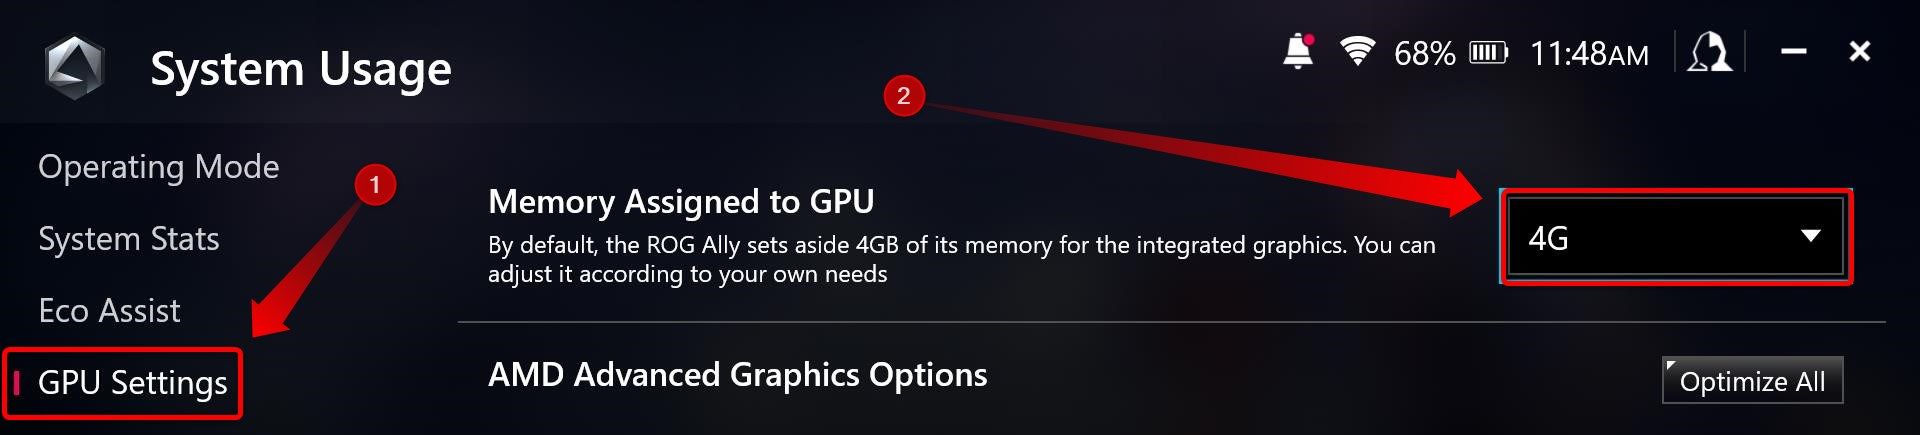
Note that you can use the “Auto” setting, which works fine for most games. That said, the “Auto” VRAM option can lead to stuttering in some games. Personally, I use the 4GB option, but I stream demanding games from my PC to my Ally, so your mileage may vary if you run all games locally on your Ally.
A Couple of Bonus Tips
Last but not least, I’m sharing a few bonus tips that I couldn’t fit into any other section.
Avoid Using SD Cards For Expansion
The ROG Ally is a great device, but its SD card reader is broken, and none of the software updates or hardware revisions have fixed it. If you want to risk getting your SD card fried, go for it.
However, my recommendation is to avoid using SD cards for storage expansion. If you need the extra storage, upgrading the SSD is fairly simple, and you can find a ton of SSD upgrade guides online.
Press and Hold the Command Center for Ctrl+Alt+Del
This is pretty self-explanatory. If you need access to the Ctrl+Alt+Del screen at any time just hold the Command Center button—left side, under the View button—for three seconds.
Remove OpenCL, OpenGL, and Vulkan Compatibility Pack
The latest Windows update at the time of writing this guide has introduced an app called “OpenCL™, OpenGL®, and Vulkan® Compatibility Pack” that has completely broken gaming performance for many ROG Ally owners. If you notice that your gaming performance has fallen off a cliff, open your apps list (Start > All Apps), look for the app, and delete it.
Check r/ROGAlly From Time to Time
My final advice is to bookmark theROG Ally subreddit , which is super active. Visit it after you notice that a new Windows, BIOS, or Armoury Crate update is available for download to see whether the said update introduces any issues before you apply it.
In the past, Windows and BIOS updates had either degraded performance or carried various issues in the trunk, and the ROG Ally subreddit always comes to the rescue with a PSA post or two, warning owners to either skip the update, or providing a potential solution.
The subreddit is also a great place to look for solutions to any other issues you might encounter. Search using the usual controls and you’re bound to find someone else having the same issue, along with some advice that can fix it.
Also read:
- [Updated] Epic Zombie Battles Our Favorites Revealed for 2024
- [Updated] Logo Magic Sprucing Up Your Podcast's Visual Appeal
- [Updated] Unlocking Windows 11 Your Ultimate Cheat Sheet
- [Updated] YouTubers' Dream Gear Top Cameras Unveiled
- 2 Ways to Transfer Text Messages from Honor Magic 5 Lite to iPhone 15/14/13/12/11/X/8/ | Dr.fone
- 2024 Approved Discreetly See FB Snapshots
- 5 Exceptional Trackball and Touchpad Devices for iPad Users
- Best Selection: The Top 10 News Aggregation Services
- Expertly Selected Home Theater PCs Dominating the Market
- In 2024, The Ultimate Guide OBS Streams to Facebook Success
- In-Depth Mavix M9 Chairs Assessment – Your Ideal Companion for Marathon Gaming Sessions
- IPhone Showdown: The Ultimate Face-Off Between iPhone 15 Pro & Pro Max Specifications
- The Mutable Nature of the Patekfly Tripod 12
- The Ultimate Asus ROG GT-AC5300 Analysis: Crafted Exquisitely for Gamers & Tech Savvies
- Unveiling the 15 Leading Cameras Excluding GoPro
- Unveiling the Truth Behind SATA and PCIe Expansion Cards
- Which Reigns Supreme in Email Management: Gmail or Outlook? A Comprehensive Review
- Title: Expert Guide to Optimize ASUS ROG ALY Laptop: Top 20 Tips for Longer Battery Duration and Superior Gaming Sessions
- Author: Kenneth
- Created at : 2024-09-24 19:05:02
- Updated at : 2024-10-01 21:09:54
- Link: https://buynow-tips.techidaily.com/expert-guide-to-optimize-asus-rog-aly-laptop-top-20-tips-for-longer-battery-duration-and-superior-gaming-sessions/
- License: This work is licensed under CC BY-NC-SA 4.0.