Eliminate Stick Drift Problems on Your Steam Deck with These Simple Solutions
Eliminate Stick Drift Problems on Your Steam Deck with These Simple Solutions
Quick Links
- Restart Your Steam Deck and Try Again
- Recalibrate the Analog Sticks in Desktop Mode
- Increase the Joystick Deadzone in Game Mode
- Clean the Affected Thumbstick With Compressed Air or Contact Cleaner
- Replace the Thumbsticks on Your Steam Deck

Key Takeaways
- Recalibrate your Steam Deck’s joysticks in Desktop Mode, and increase the joystick deadzone in Game Mode to eliminate stick drift..
- If the issue persists, try cleaning the affected thumbstick with compressed air or contact cleaner to fix any potential physical blockages.
- If all else fails, replace the entire joystick module with one matching your Steam Deck’s joystick type.
If one of the thumbsticks on your Steam Deck develops stick drift, there are several solutions you can try to fix the issue. They range from the simple, like recalibrating the stick, to DIY adventures like opening your Deck and replacing the joystick module. Let’s go through them all.
Restart Your Steam Deck and Try Again
The simplest fix you can try is to restart your Steam Deck and then try playing the same game to see if that fixes your problem. If the problem persists, go through the control settings menu of the said game and make sure no options are set in such a way that can mess with the stick movement or sensitivity.
If that didn’t work, launch another game and try playing it to see whether the problem is still present. Drift in one game but not another points to the game being to blame. If your thumbstick is still drifting, it’s time for a visit to Desktop Mode.
Recalibrate the Analog Sticks in Desktop Mode
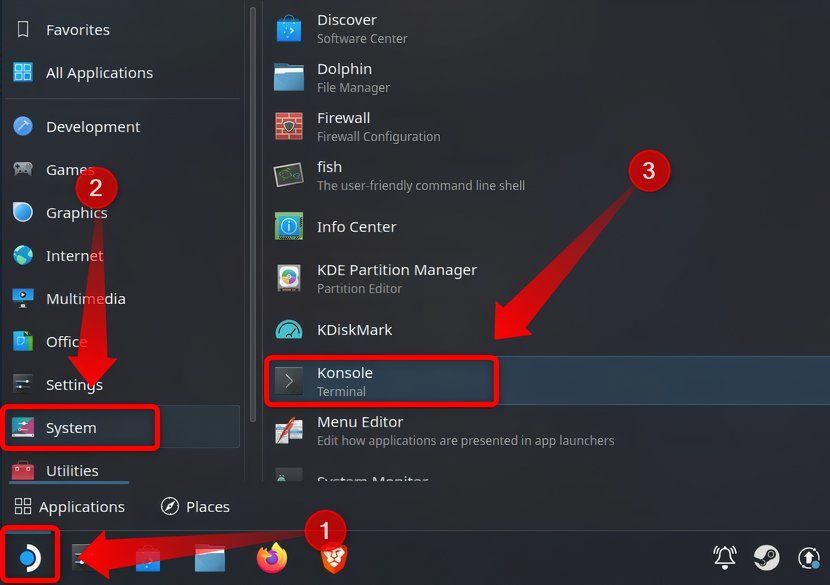
You can recalibrate your analog sticks in Desktop Mode. To go to Desktop Mode, press the Steam button then select Power > Switch to Desktop.
Once there, click the “Application Launcher” icon followed by “System” and then scroll down until you locate the “Konsole” app.
Open Konsole, pull up the virtual keyboard by pressing the X button, type the following:
thumbstick_cal
Hit Enter on the virtual keyboard.
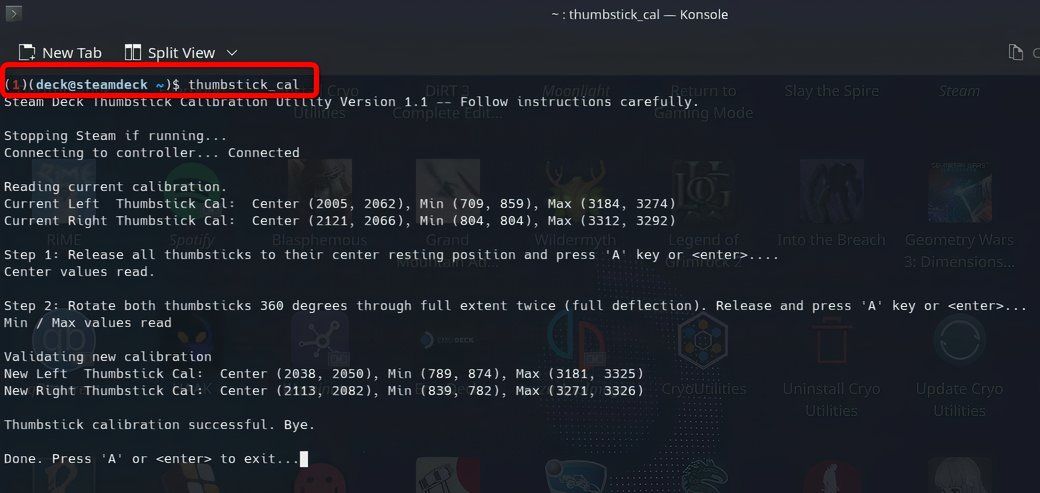
Now follow instructions to complete the calibration process. Firstly, let go of both sticks and press the A button. Next, tap the taskbar at the bottom of the desktop so that your cursor is out of focus of the Konsole window, and then rotate both joysticks 360 degrees two times, tap on the Konsole window to get back into focus, and press the A button again. That’s it.
Now you can return to Game Mode and test the affected stick.
Increase the Joystick Deadzone in Game Mode
If you’re still experiencing issues, press the Steam button > Settings > Controller. Then open the “Calibration & Advanced Settings” menu.
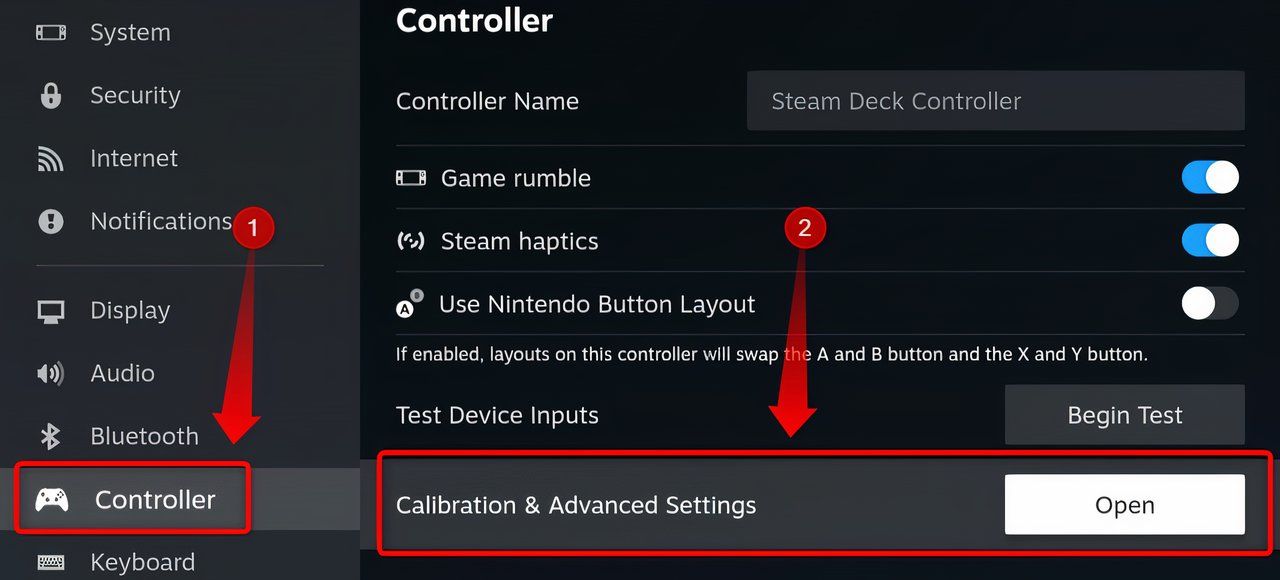
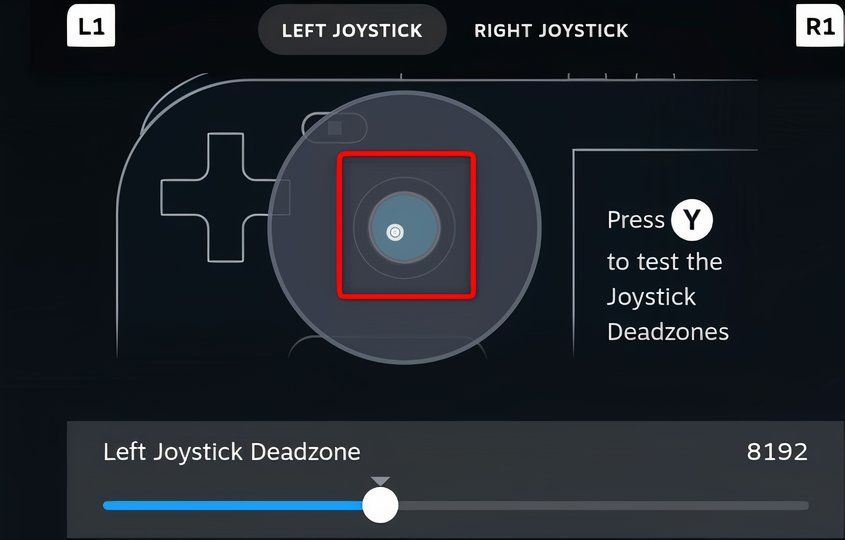
Select the “Left Joystick Deadzone” option and press the Y button to test its deadzone. If your right stick is drifting, select the “Right Joystick” option instead, with the R1 button.
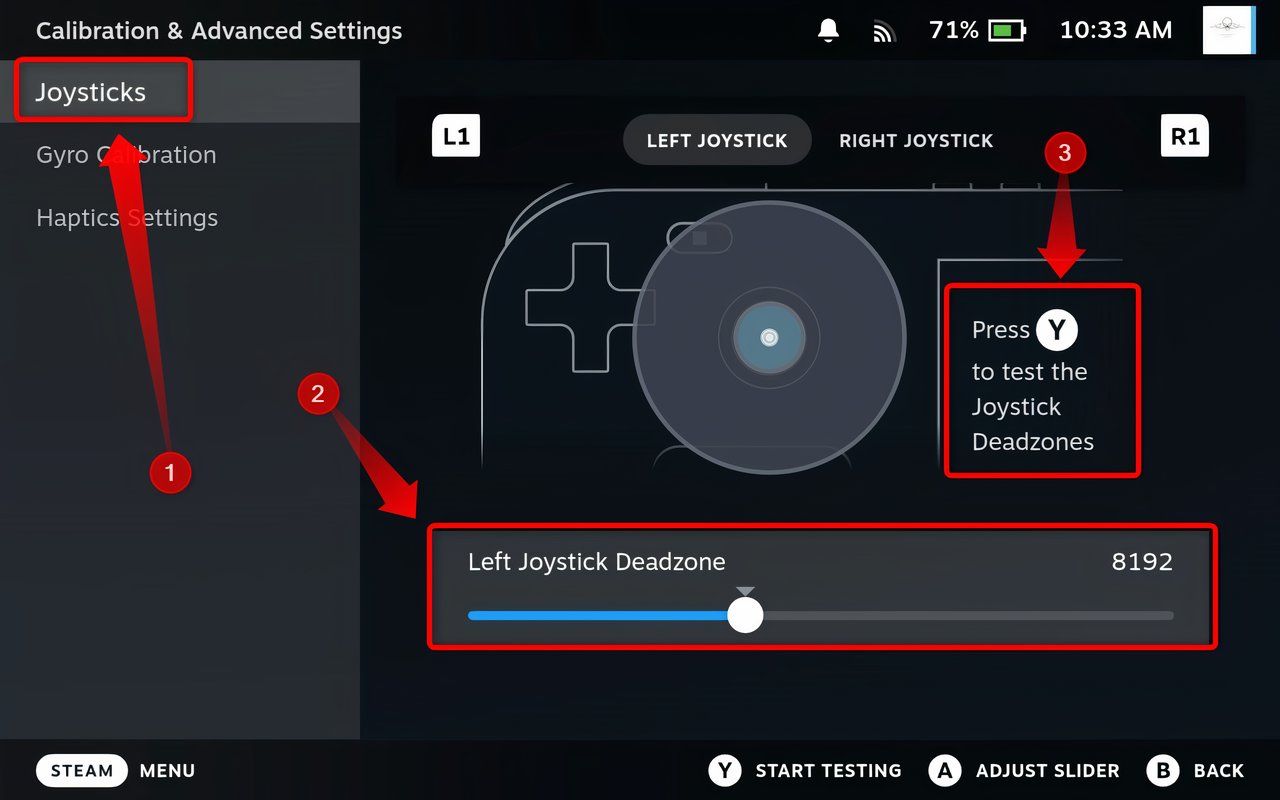
As you can see below, testing the deadzone shows just how much your stick is drifting. My left stick is drifting a bit, but not enough for drift to show in-game, at least with the default deadzone setting.
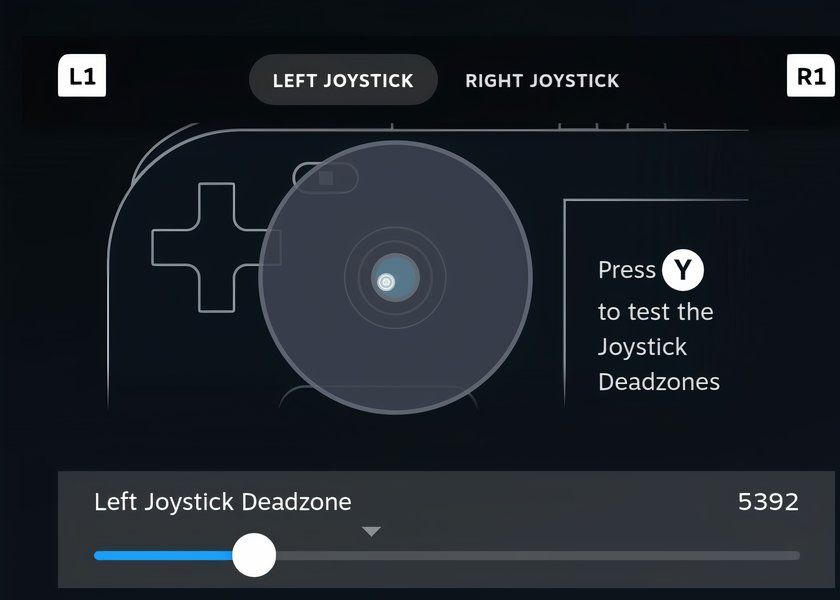
In fact, I can drop the deadzone to about 5400 and still be fine. If you’re noticing drift, you’ll most likely have to increase the deadzone above the default value of 8192. The max value is set at 18000.
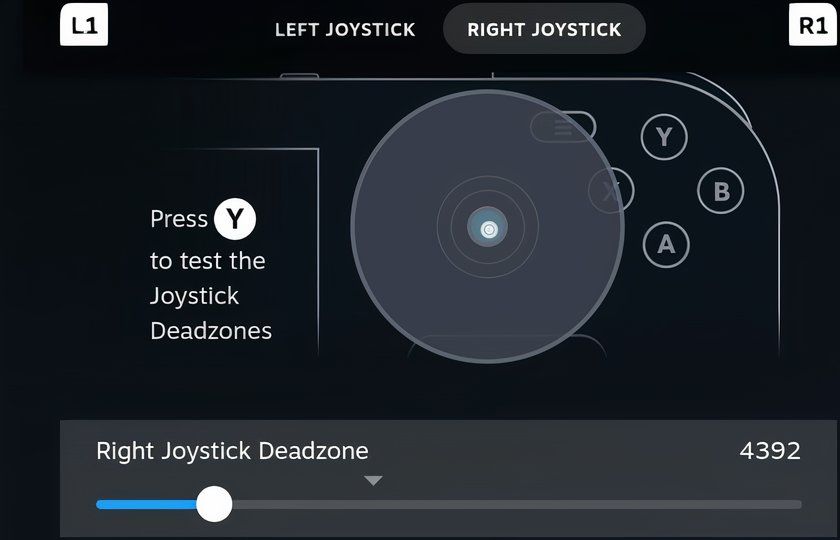
Just for reference, my right stick is doing much better, and I can drop the deadzone value all the way down to about 4400 and still be fine.
Clean the Affected Thumbstick With Compressed Air or Contact Cleaner
If your stick is drifting so much that you have to set a deadzone value so high it makes the stick feel too laggy in games, you might want to try opening your Deck and cleaning it with a contact cleaner like WD-40 or BW-100 .
Before I cover that, let me cover another potential issue. You might get a tiny spec of dust or sand stuck between the shell and the joystick cap, or just have gunk accrued on the stick cap, preventing it from reaching the resting position. If you notice this, a can of compressed air could be a solution to the issue.
I experienced a similar issue where I noticed that a tiny speck of dust or sand had been caught between the shell and the stick cap, creating friction that didn’t feel right. Things felt slightly gritty when moving the stick around. Luckily, it wasn’t serious enough to prevent the stick from returning to the resting position, but the feeling of moving it around was far from pleasant.
What I did was get a can of compressed air, move the stick all the way to the left (or right, it doesn’t matter really) and then spray the air all around the cap while slowly rotating the stick. I fixed the issue after a couple of rotations, so try this if you face a similar issue.
If you don’t have a can of compressed air lying around, you can try using a toothpick. Just be sure to be super gentle to not break and leave the top of the toothpick inside your Deck.
If your stick still drifts or if you don’t face this kind of issue, it’s time to open your Deck and clean the joystick with a contact cleaner, as long as you’re out of warranty. If your Deck is still under warranty I strongly recommend contacting Valve and going through the RMA process instead of opening your Deck, which can void your warranty.
If your Deck is out of warranty, and you’re feeling comfortable opening it, follow this guide from iFixit if you own an LCD Deck. If you own a Steam Deck OLED, iFixit has two joystick replacement guides, one for the left stick and one for the right .
Just follow the guides until you remove the joystick module. Then pop the thumbstick cap off, spray some contact cleaner on the joystick module, pop the cap back on, move the stick around for the cleaner to work its magic, and reassemble the stick and your Deck.
If the stick’s still drifting around, it’s time to replace it.
Replace the Thumbsticks on Your Steam Deck
If nothing else works, you’ll have to replace the whole joystick module.
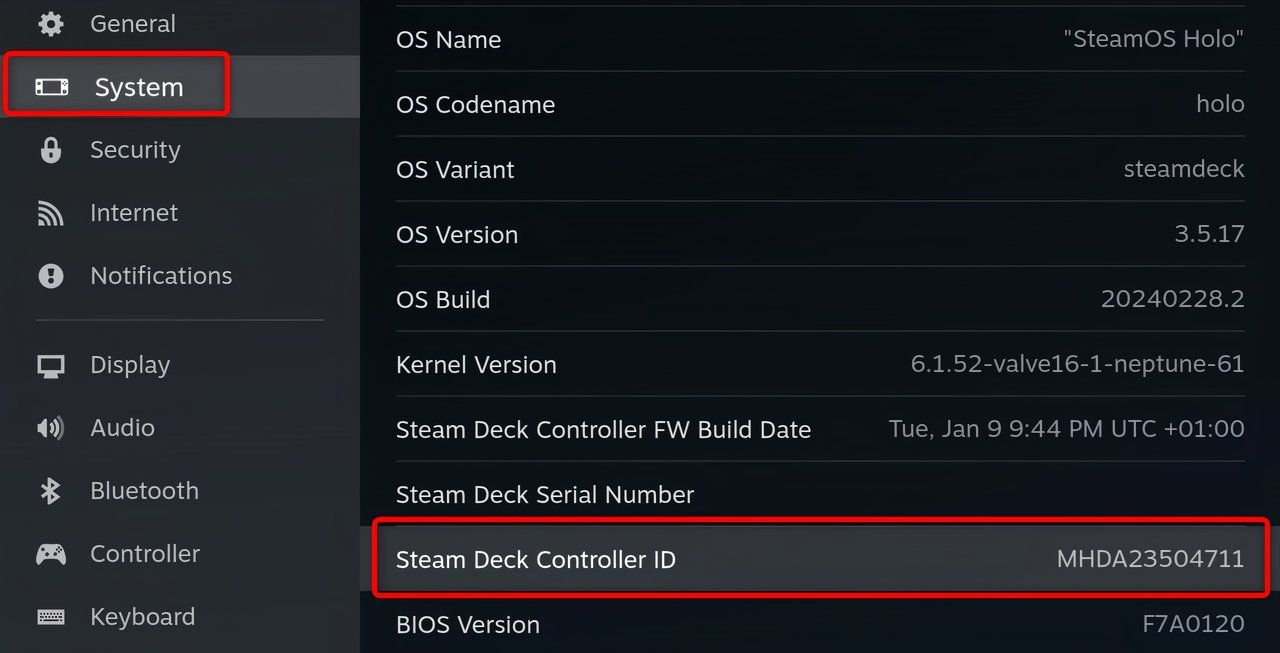
The iFixit store sells Steam Deck left and right thumbstick replacement modules. Alternatively, you can get a pair of Hall Effect joysticks from GuliKit . Hall Effect joysticks use magnets instead of contacts which makes them far less susceptible to stick drift . Before ordering one, check out to see whether you have a Type A or Type B module. Do this by pressing the Steam button > Settings > System.
Once in the System menu, scroll down until you locate the “Steam Deck Controller ID” tab. Once there, check the first four letters of the ID. If the letters read “MEDA” you’ve got a type A module. If the letters read “MHDA,” like in my case, you’ve got a type B module.
Now, once you have ordered the modules—I recommend ordering the whole Fix Kit if you don’t have appropriate tools already—follow the iFixit video guide in case you own a Steam Deck LCD. And by that I mean follow it to the letter, to avoid any problems because the procedure can be a bit tricky to perform.
If you own a Steam Deck OLED, check out the guide for replacing the left module , or the guide for replacing the right one , depending on which of the two thumbstick has drifting issues.
While you’re replacing the thumbstick, you could also replace your Steam Deck’s SSD. We’ve got an in-depth guide that can help you with that, as long as you own a Steam Deck LCD with a silver heatsink cover.
Also read:
- [New] Graphic Animation Basic Knowledge & Practices
- [Updated] Pixelated Panoramas InstaSlideShow
- 2024 Approved Turning Social Media Sounds Into Functional Phone Alarms
- Discover the Benefits of Owning a Toshiba 55 Fire TV EDGE for Amazon Prime Members – Comprehensive Review
- Discovering Family Fun with Maisto's Remote Control Rock Crawler - An Expert Review
- Economical Review of the Mobvoi TicWatch E2: Great Bargain, Mediocre Experience
- Exploring the Powerhouse That Is the Asus Zephyrus G14 - An Elite Gamer’s Dream
- How to Find iSpoofer Pro Activation Key On Honor Magic5 Ultimate? | Dr.fone
- How to Fix the Soft Bricked Samsung Galaxy A05? | Dr.fone
- How to Maximize Speaker Volume Effectively on Windows Operating Systems (XP-11)
- Linksys Velop Evaluated: A Comprehensive Review of Its Performance in Mesh Connectivity
- Master the Art of PS4 Camera Placement for Improved Streaming Quality
- Mastering PS4 Camera Position: A Step-by-Step Guide
- Unexpected Display Settings Issue: Windows 10 Fixed
- Unveiling the Capabilities: In-Depth Look at DJI Phantom 4 Pro v2 Reviewed
- Title: Eliminate Stick Drift Problems on Your Steam Deck with These Simple Solutions
- Author: Kenneth
- Created at : 2024-09-29 16:50:53
- Updated at : 2024-10-01 20:22:38
- Link: https://buynow-tips.techidaily.com/eliminate-stick-drift-problems-on-your-steam-deck-with-these-simple-solutions/
- License: This work is licensed under CC BY-NC-SA 4.0.